Instant Savings
 Rebate Claims
 Support
 Find a Dealer
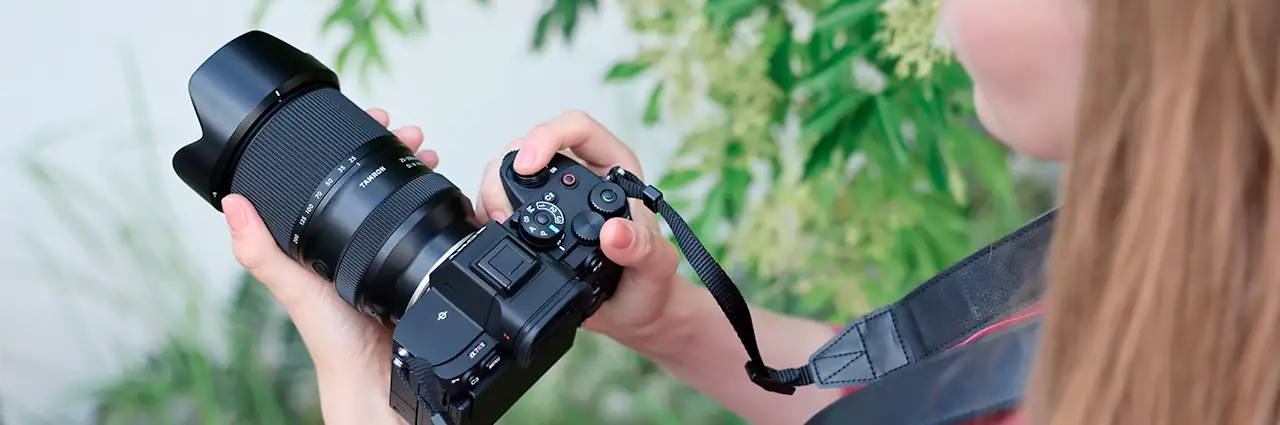
Photography basics are the essential skills that let you control how a picture looks: understanding the exposure triangle—aperture, shutter speed, and ISO—achieving sharp focus and applying basic composition. Together, these fundamentals help you manage light, freeze or blur motion, control depth of field, and arrange subjects with purpose.
You do not need to master every camera function at once. Learn how light, focus, and framing work together, then practice one choice at a time until operating the camera begins to feel natural.
Table of Contents
- What Are the Basics of Photography?
- How Do You Use a Camera?
- Understanding the Exposure Triangle
- What Is Aperture?
- What Is Shutter Speed?
- What Is ISO?
- How to Get Sharp Focus
- Composition Basics
- Understanding Focal Length and Lenses
- Understanding MTF Charts and Lens Performance
- Choosing Your Camera and Lens
- Photography Basics FAQs
What Are the Basics of Photography?
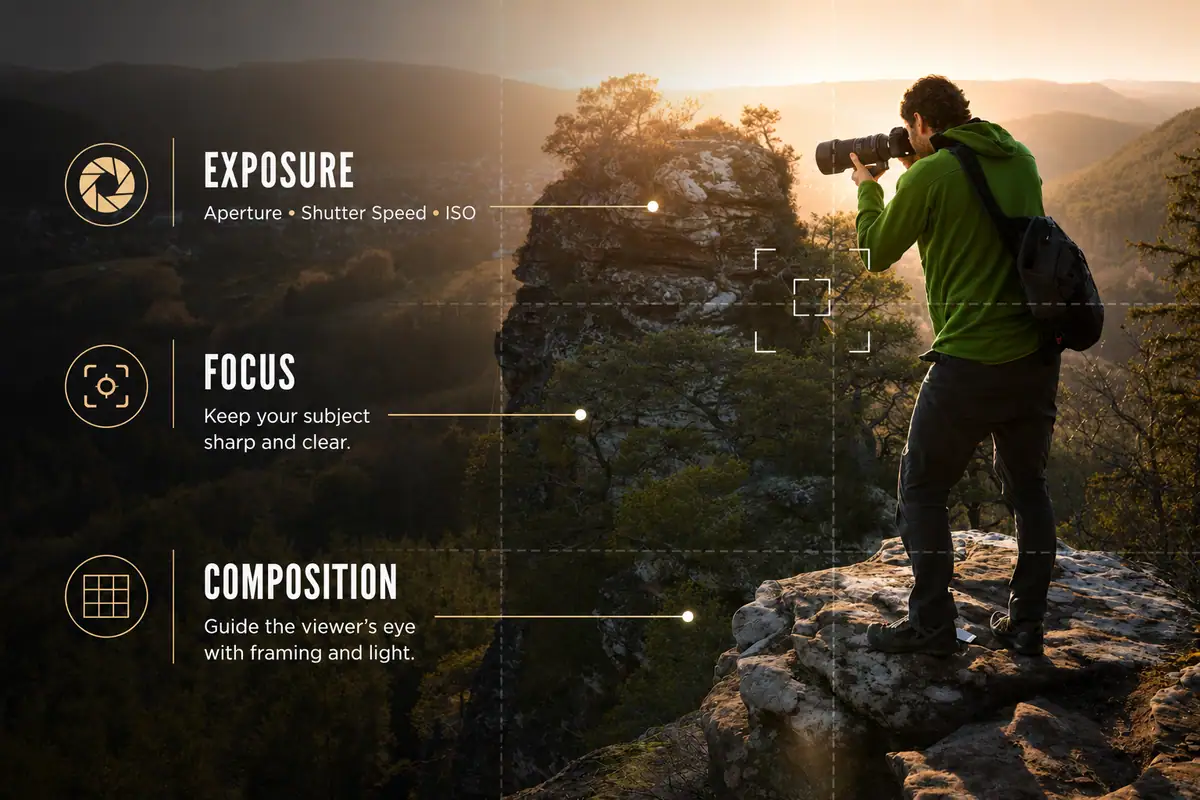
Photography basics come down to understanding the exposure triangle, which controls how much light reaches the sensor, getting sharp focus, and applying basic composition rules. Photography is the art of capturing light, so mastering the fundamentals means learning how your camera controls that light and how you frame what is in front of it.
Aperture, shutter speed, and ISO determine how light is recorded. Focus decides which details appear sharp, while composition organizes the subject, background, light, and visual lines inside the frame. Because these choices interact, changing one setting can affect both exposure and the photograph’s creative look.
How Do You Use a Camera?
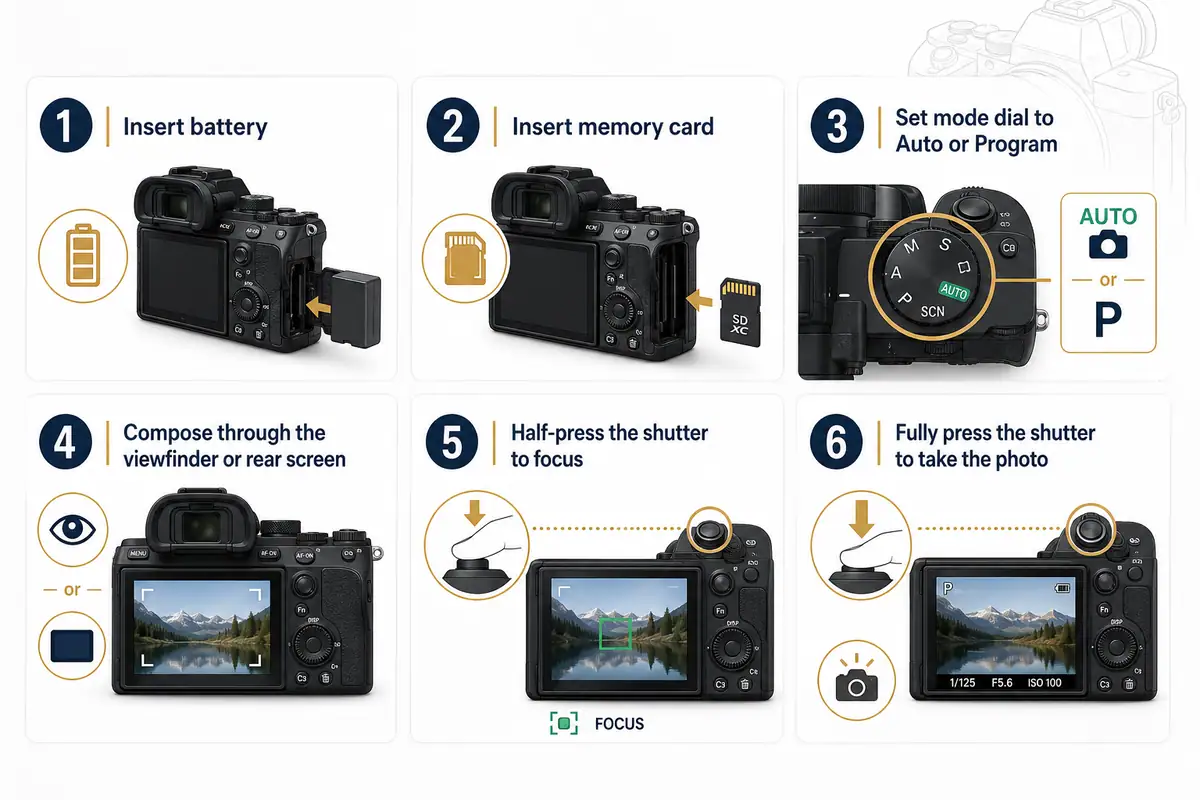
To start using a camera, insert a charged battery and memory card, set the mode dial to Auto or Program, compose through the viewfinder or rear screen, half-press the shutter button to focus, and fully press it to take the photo. This simple sequence gets you shooting while the camera handles most settings.
Before shooting, confirm that the lens is attached, the memory card has space, and the battery is charged. Look for a clear subject, hold the camera steadily, place the focus point over that subject, half-press to confirm focus, and press the shutter smoothly.
Review the result for brightness, sharpness, and framing, then adjust and shoot again. As confidence grows, move into Aperture Priority, Shutter Priority, and Manual mode.
Six-step summary:
- Insert a charged battery
- Insert a memory card
- Set the mode dial to Auto or Program
- Compose through the viewfinder or rear screen
- Half-press the shutter button to focus
- Fully press the shutter button to take the photo
Understanding the Exposure Triangle
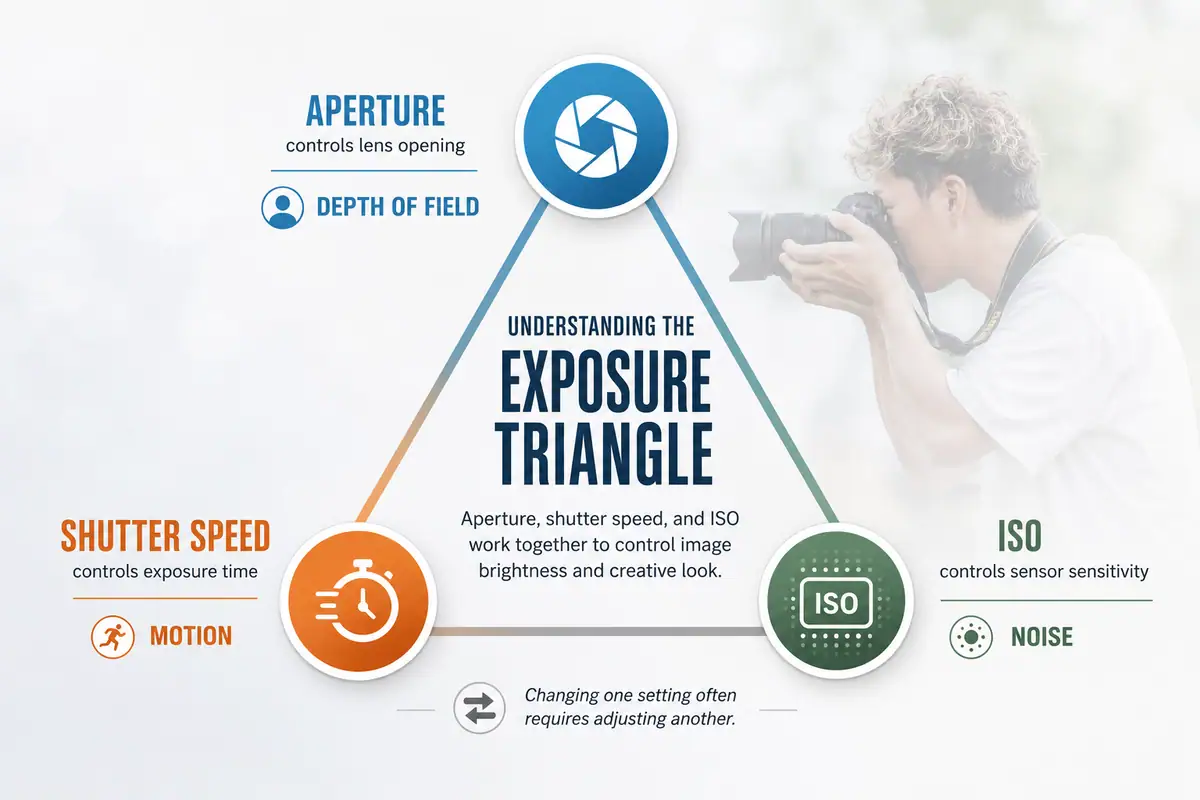
The exposure triangle is the relationship between aperture, shutter speed, and ISO—the three settings that work together to control an image’s brightness and creative look. Aperture controls the lens opening, shutter speed controls exposure time, and ISO controls how strongly the camera responds to the light it records.
Changing one part of the triangle often requires adjusting another. A faster shutter speed freezes motion but admits less light, so compensate with a wider aperture or higher ISO. A narrower aperture keeps more of a scene in focus but requires a slower shutter speed or higher ISO to compensate.
Each setting has a visual effect: aperture controls depth of field, shutter speed controls motion, and ISO affects brightness and image noise.
What Is Aperture?

Aperture is the size of the lens opening, measured in f-stops. A low f-stop such as f/1.8 creates a wide opening, admits more light, and can blur the background, while a high f-stop such as f/16 creates a smaller opening and keeps more of the scene in focus.
Lower f-stop numbers mean wider openings; higher numbers mean narrower openings. A wide aperture can help in low light or isolate a portrait subject. A narrow aperture can keep more of a landscape or group in focus, although it admits less light.
Learn more in What Is Aperture in Photography? and Why Do I Need a Fast-Aperture Lens?
What Is Shutter Speed?
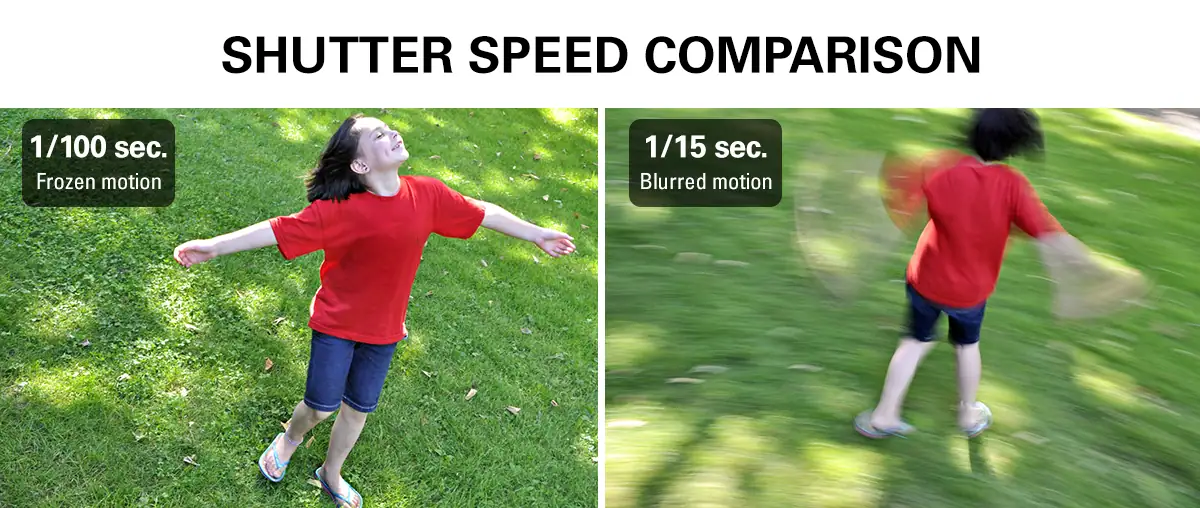
Shutter speed is how long the camera sensor is exposed to light, measured in seconds or fractions of a second. A fast speed such as 1/1000 freezes action, while a slow speed such as 1/10 or longer creates motion blur and usually requires careful stabilization or a tripod.
Use fast speeds for athletes, wildlife, splashing water, and other movement you want to freeze. Use slower speeds when you want flowing water, light trails, or moving people to blur. Panning photography uses a slower shutter and camera movement to keep the subject relatively sharp against a streaked background.
At 1/10 or longer, a tripod or image stabilization may reduce camera shake, but neither can stop the subject itself from moving.
Explore What Is Shutter Speed? For deeper understanding and our Sports Photography Guide for more tips on using shutter speed to create dynamic images.
What Is ISO?
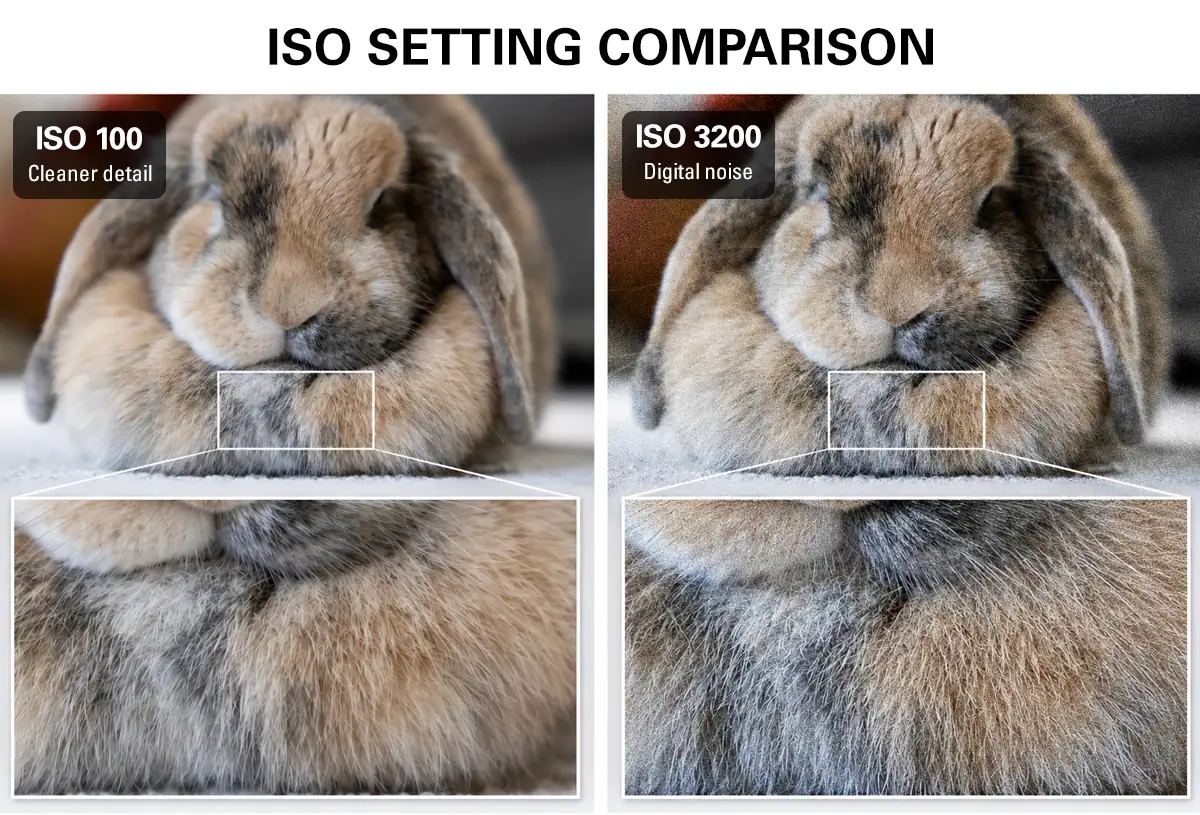
ISO measures the camera sensor’s sensitivity to light. A low ISO such as 100 produces clean, sharp images in good light, while a high ISO such as 3200 brightens photos in darker conditions but can introduce more digital noise or grain, reducing fine detail and color quality.
Begin at ISO 100 when the light, aperture, and shutter speed allow it. Raise ISO when you need a faster shutter, cannot open the aperture farther, or are working in dim conditions. A sharp image at ISO 3200 is often more useful than a cleaner image ruined by motion blur.
Use the lowest ISO that still supports the aperture and shutter speed the scene requires.
Read What Is ISO in Photography? and see the Guide to Astrophotography for more low-light applications.
How to Get Sharp Focus

Sharp focus comes from choosing the right focus mode and focus point, using a fast enough shutter speed, and holding the camera steadily. Use single autofocus for still subjects and continuous autofocus for moving subjects, then place the active focus point on the most important detail in the frame.
Focus Modes and Focus Points
Focus modes tell the camera whether to lock focus once or keep adjusting as a subject moves. AF-S is best for still subjects because it locks focus after acquisition, while AF-C continuously updates focus for motion. Focus points let you direct that system toward the exact part of the scene that matters.
Use AF-S for landscapes, products, architecture, and posed portraits. For a portrait, place the focus point on the eye closest to the camera. Use AF-C for sports, wildlife, pets, or children in motion, beginning focus tracking before the decisive moment.
A smaller focus point offers precision; a wider area can help with unpredictable movement. Keep the active area over the subject rather than letting the camera choose an unrelated foreground or background detail.
Holding Your Camera and Image Stabilization
A stable camera hold reduces blur caused by small movements during exposure, while image stabilization helps compensate for some handheld shake. Support the lens with one hand, keep your elbows close to your body, and press the shutter smoothly. Stabilization improves your odds of sharp results, but it cannot freeze a moving subject.
Stand securely, bring the camera to your face when using the viewfinder, and lean against a solid surface when available. With a longer lens, support the lens barrel rather than letting the camera body carry all the weight.
Image stabilization is especially helpful at slower shutter speeds, in dim light, or with telephoto lenses. The camera industry’s CIPA standard rates stabilization systems in stops, giving a consistent way to compare performance across cameras and lenses, though real-world results still depend on the photographer’s steadiness and the subject.
See How to Use Image Stabilization for more guidance.
Composition Basics
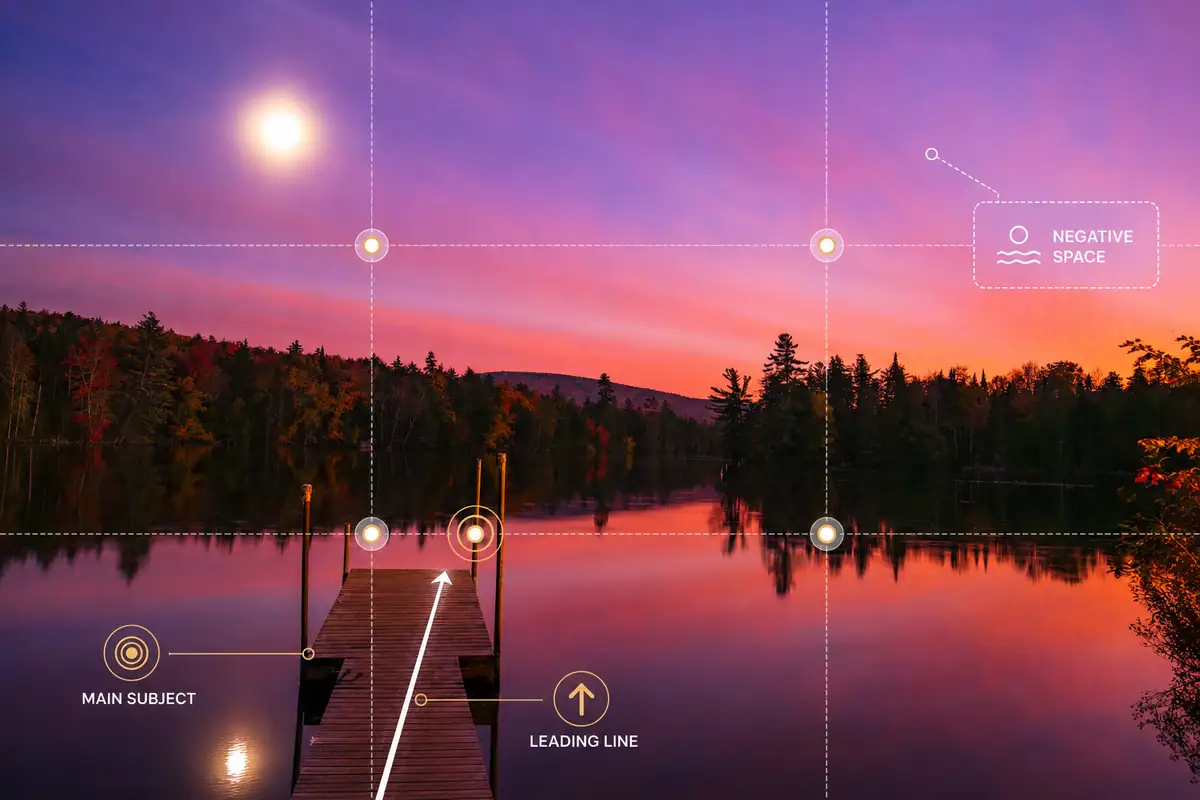
Composition is how you arrange elements in the frame to guide the viewer’s eye, built on fundamentals such as the rule of thirds, leading lines, and thoughtful use of light. Strong composition gives visual information an intentional order, helping the subject stand out and making the photograph easier to understand.
Before pressing the shutter, scan the entire frame for bright distractions, awkward edge elements, tilted horizons, and overlapping shapes. Moving a few steps or changing camera height can improve the picture more than changing a setting.
Explore the Photo Composition Beginner’s Guide for a deeper look.
Rule of Thirds and Leading Lines
The rule of thirds places important subjects near the intersections of an imagined three-by-three grid, while leading lines use roads, fences, shadows, or other shapes to direct attention through the frame. Both techniques create structure, but they work best as flexible guides rather than rules that every photograph must obey.
Place portrait eyes near the upper third or position a horizon on the upper or lower third according to whether the sky or foreground matters more. Centering can work when symmetry, repetition, or direct eye contact supports it.
Use a path, railing, shadow, or row of lights to lead attention toward the subject rather than out of the frame.
Find more ideas in How to Capture Unique Perspectives.
Using Light and Angles
Light and camera angle shape the mood, texture, depth, and emphasis of a photograph. Softer light around golden hour can be flattering and dimensional, while harsh midday sun creates stronger contrast. Changing your shooting position alters perspective, and changing focal length alters angle of view and how much of the scene appears.
Front light reveals color and detail, side light emphasizes shape and texture, and backlight can create glow or silhouettes. In harsh midday light, look for open shade or use the contrast intentionally.
Change your height and position instead of photographing every subject from standing eye level.
Learn more about angle of view and how it influences framing and perspective.
Understanding Focal Length and Lenses
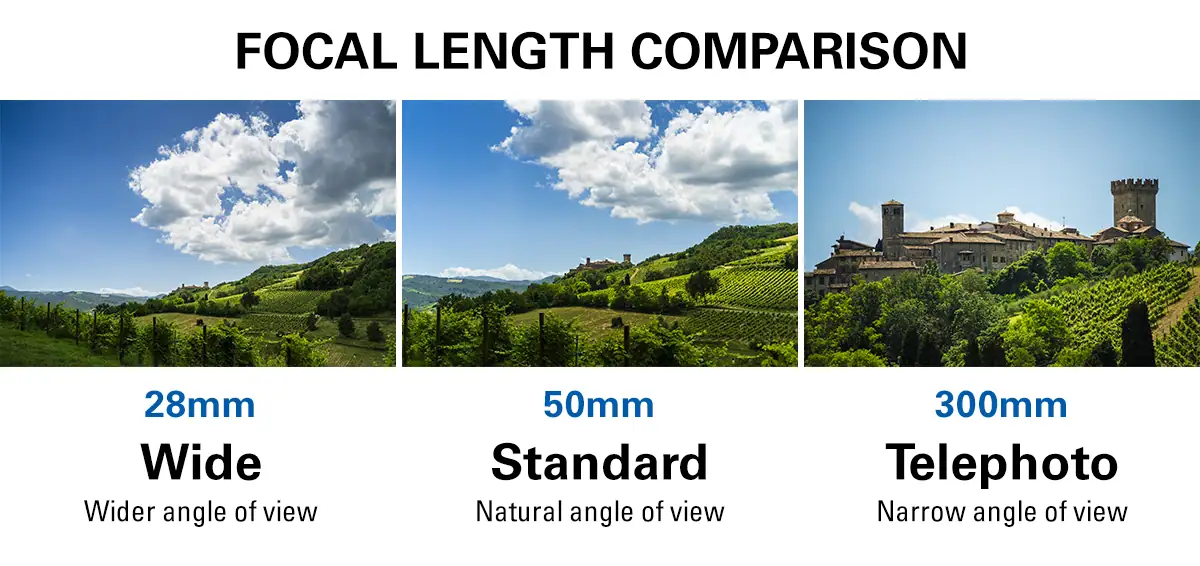
Focal length determines a lens’s angle of view and how large subjects appear in the frame, shaping whether a lens feels wide, standard, or telephoto. It is one of the most important factors in how a photograph looks because it influences framing, perspective choices, working distance, and the visual relationship between subjects.
Wide-angle lenses include more of the scene and often suit landscapes, travel, architecture, and environmental portraits. Standard focal lengths are versatile for everyday subjects. Telephoto lenses narrow the angle of view and bring distant subjects closer, making them useful for sports, wildlife, portraits, and layered landscapes.
Your distance from the subject changes perspective, while focal length determines how you frame that perspective. Moving close with a wide lens can exaggerate near-to-far relationships; stepping back with a telephoto lens can make foreground and background elements appear more tightly layered.
Learn more camera fundamentals with these guides:
- What Is Focal Length?
- The Guide to Different Types of Camera Lenses
- What Is Lens Compression?
- What Is Angle of View?
For deeper information about lenses, read the guide to lens basics.
Understanding MTF Charts and Lens Performance
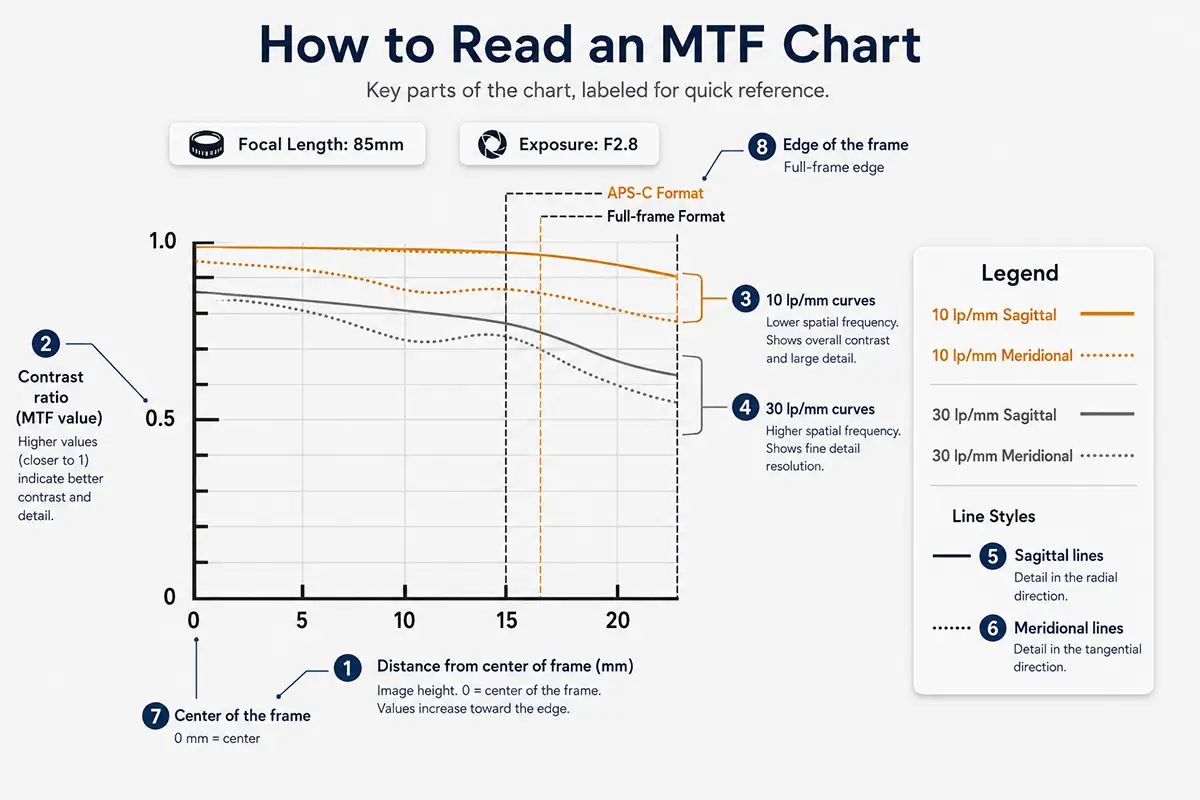
When researching camera lenses, you may come across an MTF chart, or Modulation Transfer Function chart. This graph provides information about how well a lens reproduces contrast and fine detail from the center of the image toward the edges.
In general, higher and more consistent MTF curves indicate stronger optical performance at the conditions represented by the chart. However, MTF is only one way to evaluate a lens. Autofocus performance, focal range, aperture, size, weight, close-focusing ability, and real-world image quality should also factor into your decision.
If you want to understand what the lines and measurements mean, learn how to read an MTF chart and how MTF data can help you compare lenses.
Choosing Your Camera and Lens
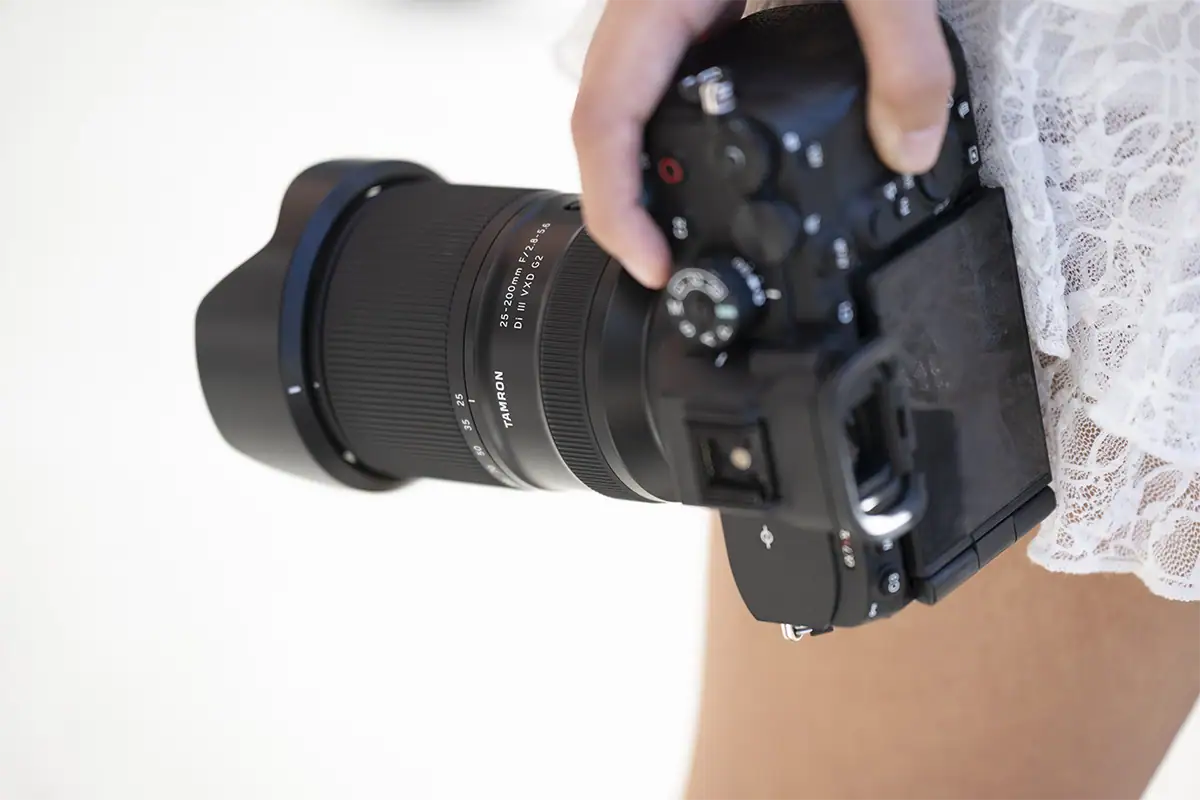
When choosing a camera, the biggest early decision is sensor size, often APS-C versus full frame, which affects system size, cost, and image quality.
Read RAW Image Format vs. JPEG for further details.
Then explore Tamron’s lens buying guides to find the right lens for your camera and subjects, or dive deeper through any linked guide above.
- Sony E-mount Lens Buyer’s Guide
- Canon RF-mount Lens Buyer’s Guide
- Fujifilm-X mount Buyer’s Guide
- Nikon Z mount Lens Buyer’s Guide
Build Your Foundation, Then Choose the Right Gear
Understanding photography fundamentals turns a camera’s automatic decisions into deliberate creative choices. Once you know how exposure, focus, and composition work together, you can select settings with purpose, recognize why a photo succeeds or fails, and choose a camera and lens that suit the subjects and style you want to pursue.
Build confidence by practicing the exposure triangle, checking focus carefully, and simplifying your compositions.
Where to Buy Tamron Lenses
Learn more about Tamron lenses at an authorized Tamron dealer near you or shop directly at the official TAMRON Store.
Photography Basics FAQs
Photography basics FAQs usually center on what to learn first, which settings beginners should use, how difficult photography is, and whether one camera setting matters most. The answers all return to the same foundation: understand exposure, practice accurate focus, use composition intentionally, and let your settings serve the subject.
What should a beginner photographer learn first?
A beginner photographer should learn the exposure triangle—aperture, shutter speed, and ISO—first, then build reliable focus and basic composition skills. These concepts form the foundation for every other technique because they determine how bright the image is, what appears sharp, how motion looks, and how the viewer experiences the frame.
Practice by changing one variable at a time and comparing the results. Repetition makes each setting’s effect easier to recognize.
What camera settings should I use as a beginner?
A beginner should start in Auto or Program mode, then move to Aperture Priority as confidence grows. Aperture Priority lets you choose depth of field while the camera selects a corresponding shutter speed. Keep ISO low in good light, raise it when necessary, and watch that shutter speed remains fast enough for a sharp photo.
Next, try Shutter Priority for moving subjects. Review aperture and shutter speed whenever you need to connect a setting with its visual effect.
Is it hard to learn photography?
Photography is not hard to learn because the fundamentals become straightforward once you understand how the exposure triangle works. With regular practice, many beginners can use manual or semi-manual modes confidently within a few weeks. The challenge is less about memorizing settings and more about recognizing which creative choice a scene needs.
Practice consistently, review mistakes, and repeat similar situations. A few well-understood controls are more useful than memorizing every menu item.
What is the most important camera setting?
There is no single most important camera setting because aperture, shutter speed, and ISO work together. Aperture is often the best starting point, however, because it affects both exposure and depth of field. From there, choose a shutter speed that handles motion and an ISO that supports the other two settings.
Let the subject set the priority: choose shutter speed first for action, aperture first for depth of field, and ISO as needed to support those choices.
About the Author
 Stacie Errera is Vice President of Marketing and Communications for Tamron Americas, where she has been with Tamron for more than 36 years. She is also a photography educator who teaches new camera users how to better understand their cameras and photography basics. She leads weekend photography workshops for women. Read Stacie’s full bio >>