By Jenn Gidman
Images by Charley Voorhis
If you’re looking for the “ultimate road trip,” head to the Pacific Northwest. That’s where the Cascade Loop Scenic Byway is located: a 440-mile route that starts just south of Seattle in a little town called Mukilteo, heading east along Highway 2 through the southern Cascade Mountains. “It’s an all-encompassing representation of Washington and what the state is known for,” says Charley Voorhis, a local photographer commissioned to help loop organizers document and promote the route. “It takes you through all kinds of landscapes and sceneries. It’s definitely doable in one epic day if you really pushed it, but it’s best traveled over four days and three nights to really experience each region.”
To capture the Cascade Loop for his client, Charley focuses on three main aspects: lodging, adventure, and sightseeing. “That’s the client’s agenda as to what they’d like to show, so that’s usually what I concentrate on photographically when I travel the loop,” he says. “But personally, I’m most attracted to the adventure and landscape side of things. There’s majestic beauty all along the route, and I make sure I’m up at 4 a.m. and shooting all the way through to sunset to capture all of it.”
For two recent trips along the loop, Charley tapped into his full Tamron lens arsenal, including the SP 15-30mm F/2.8 VC Wide-Angle (see Tamron’s latest wide-angle zooms here), the SP 24-70mm F/2.8 VC G2, and the SP 150-600mm VC. “They’re all so sharp and versatile,” he says. “Being out in nature with these landscapes sprawled out in front of me, I usually always have the 150-600 readily available, because gorgeous things can happen in front of the camera; I need the reach so I can immediately zoom in on them. And the 15-30 has revolutionized my ability to think wide, because I can use it on a full-frame camera (my previous wide-angle lens was an APS-C lens). The 24-70, though, is the lens that lives on my camera as my go-to. All three lenses allow me to work a lot quicker, which is important when you’re working with light that’s changing quickly.”
Charley and his team have also put together a video for the Cascade Loop Scenic Byway called “Found,” using a combination of all of his Tamron lenses. “The idea arose that we should brand the content we do as ‘found on the Cascade Loop,'” he explains. “It’s a play on words, because ultimately you ‘find’ yourself when you head out on an epic road trip like this. That’s the tone I wanted to capture in this video—that we’re all soul-searching at any given time, and things happen in our lives that shape our feelings and our life trajectory. Shooting handheld video with these three lenses is terrific, because they’ve got the Vibration Compensation (VC) feature I never had previously. It allows me to take advantage of shooting in so many more situations now.”
Here, Charley talks about some of the images he captured on his trips around the loop.

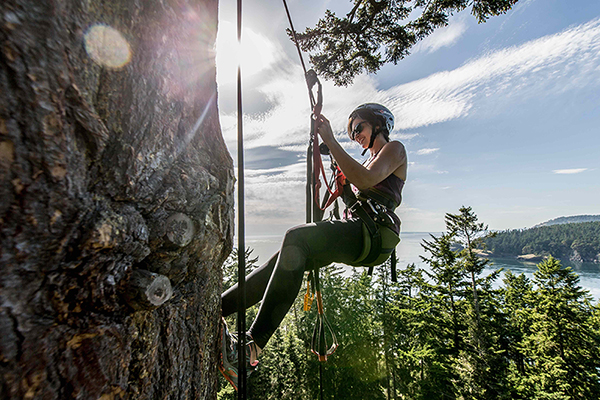
15-30mm (15mm), F/5.6, 1/500th sec., ISO 100
One of the things you can do along the Cascade Loop is what’s called a canopy tour. You pay a company to harness you up, and the staff will guide you up an old-growth Douglas fir—it’s like 300 or 400 years old.
I climbed alongside this character here, with my 15-30 snapped onto my camera, which was attached to my belt with a carabiner. Once I was up there, I was only a few feet from her, but I was still able to get a shot that wasn’t too close or intrusive. The Vibration Compensation (VC) really helped out in this case, because I was swinging around a bit while I was dangling up there. The stabilization helped me get a shot that was usable.

150-600mm (150mm), F/6.3, 1/500th sec., ISO 100
The idea here was to capture people on the lake canoeing and having a good time. Luckily, these were characters of ours, so we weren’t voyeuristically photographing random people. I was able to shout out across the water and tell them what direction I wanted them to go in and come up with different compositions along the way. I was about 50 yards away from them (about half the length of a football field). The hardest part was getting them to smile. I had to keep yelling, “You’re having fun!”
One of the cool things about this lake is it has glacial sediment along the bottom. When everything is just right, the lake turns this milky green color. To help bring out that milkiness, I positioned myself so the sun was more behind them and up to the left. If it had been directly in front of them, the glare may have become an issue.

15-30mm (15mm), F/6.3, 1/400th sec., ISO 100
Along the upper Skagit River lies Diablo Dam, which powers much of Seattle. It’s built along the granite walls of Diablo Canyon. The builders wanted to build a spectacle for the locals to visit that would connect them to the outdoors, so they tried to preserve as much of the natural landscape in the dam as possible. Instead of just creating a huge concrete monstrosity, they made it look more like a nature-esque waterfall. It gives it this otherworldly look, especially when you can stand right up on top of it and peer over the side.
Capturing this rainbow was simply good luck. What I teach my students is to have a reliable camera and lens and always be ready and opportunistic about things that present themselves. You can’t always plan on a particular element or guarantee a sunrise or sunset is going to be beautiful. But when something is beautiful, you want to be sure you’re ready for it.

15-30mm (15mm), F/10, 1/100th sec., ISO 100
The woman in this photo is Annette Pitts, the executive director of the Cascade Loop. Her job is to live on the loop, basically. She travels around it four or five times a month, connecting with all of the members of the loop along the way. The idea was that we’d take some pictures of her shooting, since she’s learning more about photography right now. We wanted an in-the-field portrait of her; this is a photo she now uses on brochures and other forms of marketing collateral, since photography is a big draw for people to travel the Cascade Loop.
We went out right before sunrise and hiked to the top of that mountain. Then, as the sun was coming up, I strategically positioned myself in that spot so the sun would be on the other side of the frame from her right as it was cresting. By closing down my f-stop somewhat, I was also able to capture it as a sunburst. I did have to shift side-to-side 5 or 6 feet to make sure the sun was positioned right where it is, for a sense of symmetry and balance. As you start shooting more, you start paying attention to how elements like that line up—and you remember that you have the power to physically move to achieve the photo you want. People forget that sometimes and keep their feet frozen in place.

24-70mm (32mm), F/2.8, 1/320th sec., ISO 400
My hope for this photo was to show an ending of sorts for our Cascade Loop story—that even after the day is done, there’s still much fun and joy to be had. It was the perfect time for my subjects to unwind and enjoy a gorgeous sunset over the ocean.
It took a lot of effort to preserve the sky in the background and have the bright fire in the foreground, all with my subjects still illuminated. My strategy was to expose for the sky and then extrapolate from there. Realize in a case like this that on your LCD screen, the foreground is always going to look a bit darker than what you’d like it to. You can always bring up the shadows a little and reveal more of that information later in post-processing.

15-30mm (17mm), F/2.8, 20 sec., ISO 2500
At one point along the North Cascades Highway, you’ll catch a glimpse of one of the most iconic rock formations in the area: the Liberty Bell. It’s a popular climbing spot when the weather is agreeable, but for photographers, it makes for a stunning subject all year round. It was going to be a little out of our way to photograph it, since we’d have to go in the middle of the night, but the workshop students I had on this trip excitedly volunteered to go on this impromptu shoot.
The night was crystal clear—perfect to teach them night techniques. None of the people on this particular tour had ever photographed stars before, so it was really an eye-opening experience for all of them. We set the composition up for the students from the side of the road, with the hope they’d be able to capture the Milky Way and witness how the camera can see a whole dimension of light you can’t see with the naked eye. We had them all use tripods, then I went around to make sure everyone knew how to turn on their timers (not everyone had a remote shutter). This way, the picture would be taken 2 seconds after they pressed the button. I explained that otherwise, even touching the camera for just that brief moment would cause camera shake and motion blur in their shots.
They all were stoked when they saw the results of what their cameras were able to do. Basically everyone who was there got at least one successful photo. There was one lady who approached me at breakfast the next morning and said, “That’s been on my bucket list forever; I can’t believe I actually got to go do that.” It’s really cool to be able to share that with newer photographers.

15-30mm (15mm), F/2.8, 20 sec., ISO 2500
This was the last shot of the night. We fired up the bus, everyone got out, and then we just photographed the bus, empty, under all of the stars. My idea was we could use that photo to promote more of our night workshops, letting people know that we have this bus we can load up, drive to an amazing place, and take these types of star shots.
I’m not sure exactly what kind of bulbs are in the bus, but for whatever reason, the lights just went to that reddish-hot pink color in the photo. It was a happy accident, because the naked eye certainly didn’t see it that way. The naked eye couldn’t even see the mountains or sky behind the bus, because the lights overwhelmed our vision in the middle of the darkness like that. It’s a bit of an experimental shot, but I think it really works.
To see more of Charley Voorhis’ work, go to www.voortexproductions.com.
