 Instant Savings
 Support
 Find a Dealer
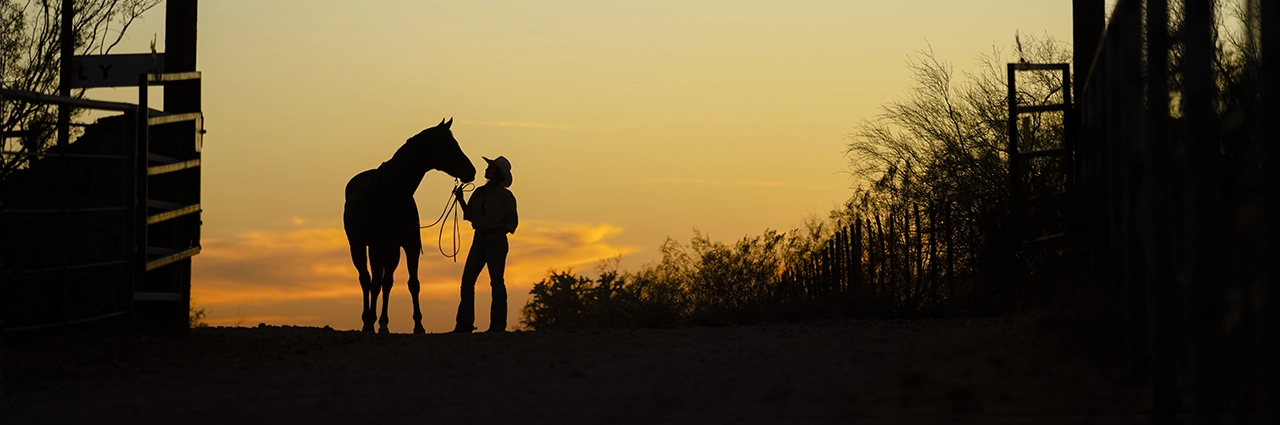
When taking photos with a digital single-lens camera, you have two options for image recording formats: “RAW” and “JPEG.” JPEG is a convenient and lightweight file format but shooting in the RAW image format allows for more precise adjustments to exposure, white balance, and other settings. This article will explain in detail the features of RAW photography and how to use it effectively.
What You’ll Learn In This Article:
- What the RAW image format is and how it differs from JPEG
- The benefits of shooting RAW vs JPEG for flexibility and quality
- How to use a RAW photo editor and development tools
- The advantages and disadvantages of RAW photography
- When to choose RAW shooting for landscapes, portraits, and low light
What is RAW Photography and the RAW Image Format?

RAW images are an image format in which the raw RGB data captured by a digital SLR camera’s image sensor is recorded as is, without any image processing or compression. Because the data is unprocessed (undeveloped), it is sometimes called a “digital negative,” a metaphor for the development process of a film camera. For those wondering what is RAW photography, think of it as the closest digital equivalent to a film negative.
Shooting in RAW photos gives you a wider range of exposure and color tone adjustments during development, making it easier to achieve the photographer’s intended expression. For example, richer gradation is possible even in scenes where JPEG is difficult to capture details, such as the subtle hues of a sunset sky or shadow areas in backlit shots. It also allows you to correct dark exposures in the field and make significant adjustments to colors to suit your preferences.
RAW Image vs JPEG: Key Differences and Benefits
When comparing RAW image vs JPEG, JPEG is sometimes likened to a “finished product” that has been processed in the camera, while RAW is like the “raw material” that has not yet been developed. Next, we will take a closer look at the main differences between them, especially for photographers deciding between RAW photos vs JPG.
RAW Image File Size Compared to JPEG
RAW images are recorded uncompressed, so the file size is very large. For example, if you shoot with a 24-megapixel camera, JPEG images will be around 3MB to 5MB, while RAW images will be roughly 20MB to 30MB, and in some cases even larger. Therefore, if you shoot in RAW, you need to make sure you have enough space on your recording media or storage and consider the RAW image extension supported by your editing software.
RAW Editing Advantages Over JPEG
RAW photos retain more brightness and color information than JPEGs, allowing for greater flexibility in post-capture adjustments. JPEGs are saved as gamma-corrected 8-bit data, limiting the range of adjustments possible. However, the RAW image format from a typical digital SLR camera is based on 12-bit or 14-bit sensor output, allowing for a wider range of tonal gradation and editing options.
For example, exposure can be adjusted over a wider range, so even if an image is underexposed on location, it can often be recovered later. Additionally, white balance can be freely adjusted. Shoot with auto white balance on location and then edit to your desired color and expression later. While JPEGs tend to lose image quality with repeated editing, RAW data is saved in a non-destructive format, minimizing image degradation even after multiple rounds of RAW editing in a RAW photo editor.
RAW Photos vs JPG: Ease of Use
RAW shooting requires a development process, meaning the files cannot be viewed directly without a RAW image viewer or a RAW photo converter. This adds time and effort to the workflow. Also, as mentioned above, the file size is large, so you’ll need to have ample storage space on your SD card and PC.
On the other hand, one of the biggest advantages of JPEG is its ease of use. After taking a photo, you can immediately transfer it to your smartphone and share it on social media or print it out. This makes shooting RAW vs JPEG a question of convenience versus flexibility.
Benefits of Shooting RAW Photos

As mentioned above, the greatest benefits of shooting RAW are the high degree of freedom they offer when editing images after capture. When it comes to exposure compensation, a much wider range of adjustments is possible compared to JPEG. Even if you look back at a photo later and think, “If only it was a little brighter…”, you can often redo it thanks to the RAW image format.
Also, if the white balance at the time of shooting is different from the intended image, or you want to adjust the color tone later, RAW allows you to freely adjust it after shooting. Even when shooting in environments with complex lighting or scenes with large differences in brightness, you can carefully change the color temperature and exposure to achieve your desired expression.
RAW Photography: Disadvantages to Consider
To summarize the points we’ve looked at so far, the main disadvantages of RAW photography are its large file size and the time and effort required for development. Since each image typically requires several tens of MB of storage space, taking and storing many RAW photos necessitates a large amount of storage.
Furthermore, since a RAW image editor or RAW photo editor is required after capture, it’s not suitable for immediate sharing or printing. Depending on the camera model and settings, there’s a chance that continuous RAW shooting performance may be reduced due to buffer memory limitations. Keep this in mind when shooting sports or bird photography, for example, where high-speed continuous shooting is important.
RAW Photo Editing and Development Process
Dedicated software is used to develop RAW data. This includes RAW photo converters, RAW image viewers, and editing suites. Image processing allows you to view and refine photos as image data on a PC or other device. This software allows for a wide range of editing, from basic adjustments such as exposure and white balance to noise reduction and sharpness adjustments.
A typical process might involve first adjusting the overall exposure and white balance, then adjusting the balance between highlights and shadows, and finally adjusting color tone and details. Saving frequently used settings as presets also allows for efficient processing. Applying the same preset to a series of RAW photos taken at the same time and in the same location can quickly achieve a consistent finish.
With JPEG, this development process is performed automatically within the camera, making such fine adjustments difficult.
When to Use RAW Shooting: Best Photography Situations
For casual and enjoyable photography with a single-lens camera, JPEG is sufficient in most situations. However, if you are in a situation where you cannot afford to make a mistake or are attempting to create a more professional-looking work, we recommend shooting in JPEG+RAW. Here we will introduce examples of how to use RAW photography in different scenarios.
Landscape Photography with RAW Photos

Landscape photography is one subject that makes the most of RAW. When shooting sunrises and sunsets, the contrast between the sky and the ground is particularly large, but RAW photos make it easier to capture the rich details of both. By deliberately underexposing and then lifting shadows during RAW editing, you can achieve beautiful balance in high-contrast scenes.
Portrait Photography in RAW Format
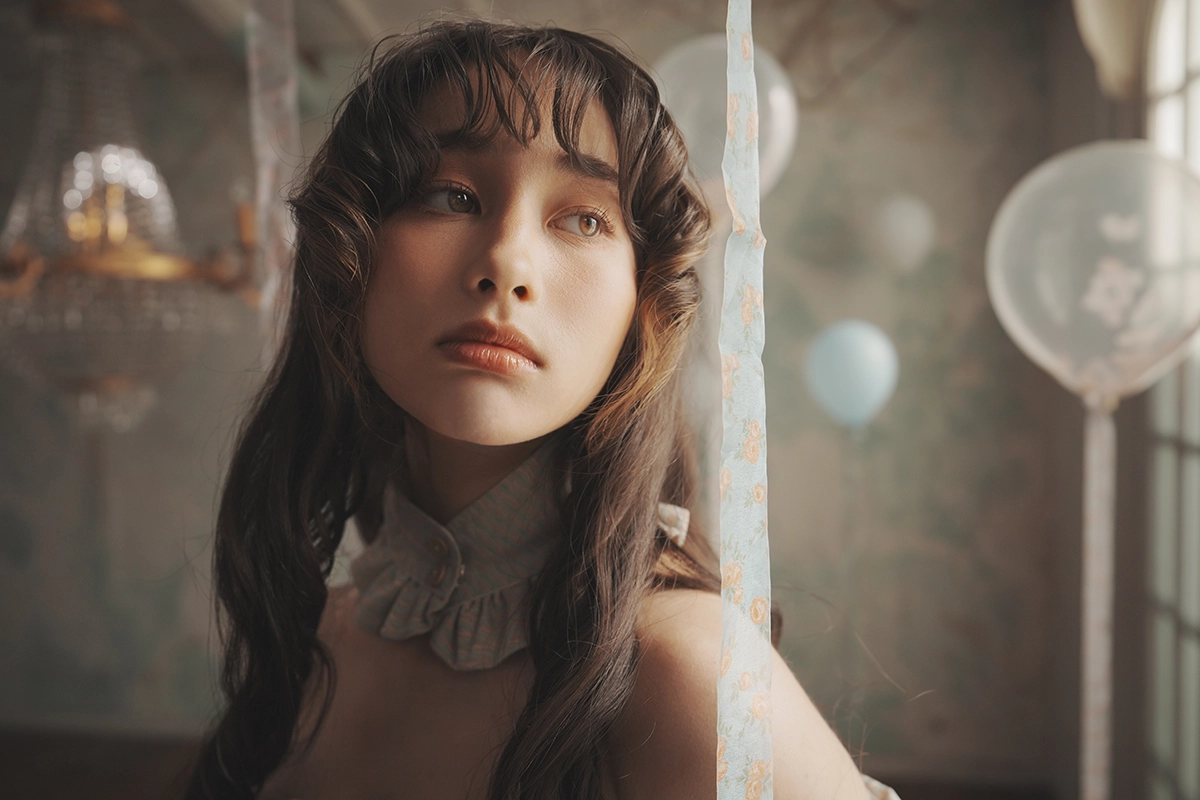
In portraits, it’s important to capture skin tones and textures. RAW images allow you to capture the natural color and texture of hair and skin in greater detail. Especially in backlit portraits, you can capture the subject’s expression while controlling highlights and shadows through RAW editing.
Low-Light and High-Contrast RAW Shooting

RAW shooting is also useful in low-light conditions such as night scenes or indoor photography. For example, when shooting night scenes, you can reduce noise in dark areas without compromising bright highlights. This is where understanding what is RAW shooting becomes crucial—it provides insurance in tough conditions.
Creative Flexibility with RAW Photo Editing

With the RAW image format, you can enhance contrast for social media, pursue sharp detail for prints, or even create a unique monochrome look. By experimenting with different processing styles in a RAW image editor, you can fully control the final mood of your image.
Tamron Lenses for RAW Photography
Tamron lenses are characterized by their excellent optical performance, combining high resolution with beautiful bokeh. Zoom lenses cover a wide range of focal lengths, making them suitable for a wide range of scenes, from portraits to landscapes. Their lightweight and compact size also makes them easy to handle, even for beginners exploring RAW photography.
All-In-One Zoom Lenses
- 18-300mm F/3.5-6.3 Di III-A VC VXD (Model B061) for Sony E, Canon RF, Fujifilm X, and Nikon Z APS-C
- 25-200mm F/2.8-5.6 Di III VXD G2 (Model A075) for Sony E
- 28-200mm F/2.8-5.6 Di III RXD (Model A071) for Sony E
- 28-300mm F/4-7.1 Di III VC VXD (Model A074) for Sony E
Wide-Angle Zoom Lenses
- 11-20mm F/2.8 Di III-A RXD (Model B060) for Sony E, Canon R, and Fujifilm X APS-C
- 16-30mm F/2.8 Di III VXD G2 (Model A064) for Sony E and Nikon Z
- 17-50mm F/4 Di III VXD (Model A068) for Sony E
Standard Zoom Lenses
- 17-70mm F/2.8 Di III-A VC RXD (Model B070) for Sony E and Fujifilm X APS-C
- 20-40mm F/2.8 Di III VXD (Model A062) for Sony E
- 28-75mm F/2.8 Di III VXD G2 (Model A063) for Sony E and Nikon Z
- 35-150mm F/2-2.8 Di III VXD (Model A058) for Sony E and Nikon Z
Telephoto Zoom Lenses
- 50-300mm F/4.5-6.3 Di III VC VXD (Model A069) for Sony E
- 50-400mm F/4.5-6.3 Di III VC VXD (model A067) for Sony E and Nikon Z
- 70-180mm F/2.8 Di III VC VXD G2 (Model A065) for Sony E and Nikon Z
- 70-300mm F/4.5-6.3 Di III RXD (Model A047) for Sony E and Nikon Z
- 150-500mm F/5-6.7 Di III VC VXD (Model A057) Sony E, Fujifilm X, and Nikon Z
Prime and Macro Lenses
- 20mm F/2.8 Di III OSD (Model F050) for Sony E
- 24mm F/2.8 Di III OSD (Model F051) for Sony E
- 35mm F/2.8 Di III OSD (Model F053) for Sony E
- 90mm F/2.8 Di III VXD (Model F072) for Sony E and Nikon Z
RAW Image Format Summary: Professional-Quality Results
The RAW image format records the information from the image sensor as is. It retains rich gradation and allows for fine adjustments such as exposure and white balance when developing with a RAW photo editor. When it comes to scenes where you want to maximize detail—landscapes, night scenes, portraits, or any moment where failure is not an option—shooting RAW vs JPEG makes all the difference.
Learn more about Tamron lenses at an authorized Tamron dealer near you or shop directly at the official TAMRON Store.