By Jenn Gidman
Images by Erik Valind
Erik Valind is known for his vibrant commercial lifestyle images and environmental portraits. But while he’d conquered capturing photos from both land and sea—a certified scuba diver since the age of 12, he’s also experienced at underwater photography—the New York City–based photographer had yet to try his hand at taking pictures from up high. That is, until this past year, when after completing an eight-month-long project for Etsy, he decided to venture in a new direction: photos taken from helicopters.
“After the Etsy job, I wanted to reassess where I was as an artist,” Erik explains. “I’ve always had a fascination with helicopters and planes, so I started looking at helicopter photography and decided I really wanted to merge all of these elements together.”
Erik started working with a couple of local helicopter companies to get his feet wet in this genre. “Before you hang your hat out to sell a product, you need to make sure it’s at the same level as the rest of your work,” he says. “My goal is to achieve that same vibrancy and environmental coverage I’m known for while maintaining focus on a certain subject in my particular style, no matter where I’m shooting from,” he says. “I’m the photographer who wants to be comfortable walking around the city, hanging out of a helicopter, or shooting 100 feet underwater—wherever I need to go to get the shot.”
The safety requirements on a helicopter ride are pretty stringent: No loose items are allowed, since there are no doors and anything that isn’t strapped in can simply fly out, so Erik has to choose his lenses carefully. “I can’t be switching lenses midair, because they can do some serious damage if they fall out during the ride,” he explains. “So in addition to the Tamron SP 15-30mm VC lens, which I like to bring for my wide-angle work, I tend toward versatile zooms like the SP 24-70mm VC or the SP 70-200mm VC G2. I want to have as many options for focal lengths as I can get on my double-strapped camera rig.”
Read on for a Q&A with Erik on how he has been achieving photos of his hometown, the Big Apple, from his on-high perch.
How are you set up in the chopper?
I came back from Australia a couple of months ago, where we rented out small charter flights. In that kind of aircraft, the windows flap out and lock up once you get to a certain altitude, and then you take pictures out the window. The helicopter setup is a little different, though—there are no doors, so you’re shooting right out of the side of the chopper. There’s a front bucket seat where the pilot sits, then another front bucket seat (where sometimes I’ve sat), and then there’s a bench in the back. If you sit on the bench, you have a harness on with a hook at the back, which is the safety tether that’s attached to the helicopter at all times. You’re also belted in with a seatbelt.
Once you get to the appropriate altitude, you take your seatbelt off and basically hang out of the helicopter. It doesn’t feel that breezy when you’re inside the aircraft, but as soon as you hang your head out of the chopper, the downward force of those blades is intense. And when you hang your camera out there, it’s a workout to hold your camera, because all of that downforce is trying to rip the camera out of your hands.
How important is it to know what you want to shoot before you head skyward?
I have a good working relationship with two pilots, which is important so you can work together to figure out what’s possible once you’re in the air. A change of a couple hundred (or couple thousand) feet in altitude can totally change the scene, so you should know what you’re trying to shoot and how you want to shoot it beforehand. That way, if you know you want a more-compressed shot of the city grid that looks like a circuit board, for instance, you’ll know to tell the pilot to fly a little higher or to approach a scene from a different angle. Having these ideas in mind before you head up into the clouds means you might be able to knock off the photos you want in 15 or 20 minutes instead of an hour, which can save you a lot of money when you’re renting a helicopter.

F/5.6, 1/800th sec., ISO 400
Speaking of which, how do you communicate with the pilot after takeoff?
We use headsets with a two-way radio. We also go through a briefing beforehand to determine what I want to shoot. You first have to pick the time of day you want to go take off, depending on whether you want to shoot at sunset or have the light coming in from a certain direction. But once you’re up in the air, you still have to tweak and adjust any predetermined plans, no matter how well you’ve previsualized things.
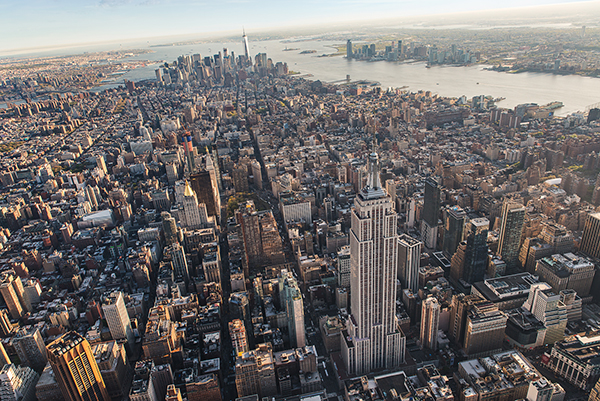
You might be cruising past the Empire State Building, for example, and think, “Wow, from this angle it looks so short and squat.” In that case, as I mentioned earlier, you’d want to let the pilot know you’d like to come at it from a different angle. Perhaps you’d like to drop a bit lower—shooting buildings from a lower perspective can make them appear a bit taller—or swing around another side of a particular building to get a better contrast of light and shadow. You’re doing a sort of dance with the pilot—it’s definitely a collaboration, so that radio communication comes in handy.

F/5.6, 1/1250th sec., ISO 400
How do you keep the camera steady while you’re in the air?
How I finessed my technique was definitely through trial and error. On my very first flight, I used Aperture Priority for a few of my photos, which I do when I shoot natural light for portraits and travel photos—it allows me to select the depth-of-field that I want, and then I let the camera select the shutter speed. But when I reviewed those images, they were all blurry, thanks to the motion blur from handholding the camera and the shake of the helicopter.
So I went back to shooting manually, making sure I have a high-enough ISO to enable me to get a fast-enough shutter speed to counteract that shake. Because I’m usually shooting with a good amount of daylight, I’ll typically have my ISO between 400 and 800, which then enables me to use a shutter speed between 1/800th and 1/2000th of a second. And, of course, I always turn on Tamron’s Vibration Compensation (VC) feature on all of my lenses.
Talk about lighting when you’re up in the air.
Lighting is huge in these situations. The time of day definitely comes into play, depending on the types of shots you’re going for. In general, for straight-down shots, a little closer to noon may be better, but if you want a separation between all of the buildings and structures, sunrise or sunset are ideal times of day to shoot.
Let me elaborate. Going out in the middle of the day is better if you’re looking to capture images taken straight down into a park or into the city’s grid, because you’ll have the sun directly behind you. As the helicopter banks, you’ll be gazing straight down with the sun behind you, which is like having an on-camera fill light that evenly exposes everything.
But while those midday photos are fun, when you’re shooting a city like Manhattan, the buildings are all stacked on top of each other—it’s very busy and compressed. If you don’t have the right light to offer highlights, shadows, and contrast for some separation, what looks like an amazing city to your eye will turn out to be a bland, boring photo.
Take my image of the Brooklyn Bridge, for example. I’d tried to capture that scene during the middle of the day on a previous flight, and it came out as a flat and unusable image. But when I reshot it at sunset, I was able to get the light coming in between the arches and lighting the American flag. That’s what really made the scene pop.

F/5.6, 1/500th sec., ISO 500
Looking for easily recognizable landmarks in a big city is a photographic goal. What else catches your eye?
When I first went up in a helicopter, one of the images I took was of Central Park, which I shot at 24mm. I needed a wider lens to capture the park, because Central Park is huge. In this particular instance, I was looking for leading lines heading into infinity—and in this image, you’ve got this gorgeous park in the foreground and the city kind of collapsing onto itself at the top of the photo.

F/5.6, 1/800th sec., ISO 400
But even though I’ve taken a good number of wide-angle photos with the 15-30 lens, what has really struck me so far during my flights is that I’m really drawn to more punched-in shots, like the ones where I’ve zoomed in on bridges. These images are like tiny slices of a giant, teeming system, as if you’re peering down at a living organism—almost like you’re looking at an ant farm.
I’ve also discussed another phenomenon in my workshops before in terms of environmental and landscape photos, which I can now apply to my helicopter images: When you encounter a scene, it’s easy to become overwhelmed by all of the various elements in front of your lens. It’s tempting to want to get them all into the frame. But as an artist, it’s up to you to select what you want to show, then show what you’ve chosen in its best possible light. That shows off your own perspective, voice, or style.

F/5.6, 1/1600th sec., ISO 400
Any other things you like to look for?
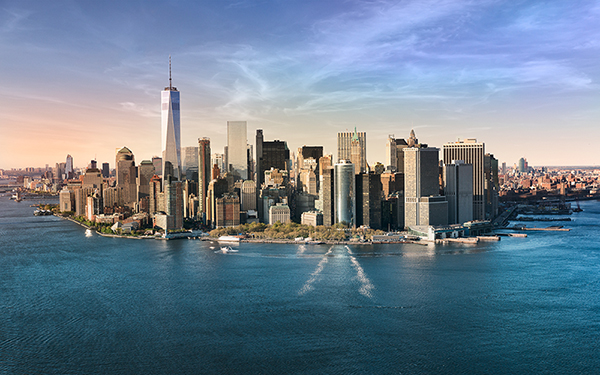
Whenever I’m doing a regular shoot that’s not up in the air, I try to post behind-the-scenes photos so you can see the location, the crew, and my lighting setups. Of course, a behind-the-scenes shot is really hard to do when you’re hanging out of a helicopter. So instead I do what I call the “look-back shot.” That’s what you see here in this image where you can see a portion of the helicopter.

F/8, 1/1600th sec., ISO 400
What makes this photo interesting is that, when you dissect it, you can see so much of the city. There’s Jane’s Carousel inside that little glass building in Brooklyn Bridge Park, with both the Manhattan and Brooklyn bridges in sight, as well as the Financial District and its piers, Governors Island in the distance, and a tiny Statue of Liberty all the way in the background. But what I especially like about this image is that I cropped it so you can see the wake of the boats underneath, kind of streaming along like the contrails from a plane. I thought it was cool that it looks like the helicopter was throwing a wake behind it.
I also enjoy seeing some of my favorite neighborhoods from the air, as you can see from my photo of the Manhattan Bridge. That bridge is near and dear to me as a New Yorker, because DUMBO (which stands for “Down Under the Manhattan Bridge Overpass”) is a really fun, up-and-coming neighborhood in Brooklyn. There are photographic or professional reasons to take pictures of things, but there are also personal reasons, which I think should definitely bleed over into your work.

F/8, 1/800th sec., ISO 400
To see more of Erik Valind’s work, go to http://erikvalind.com.
