


Sean Parker gives tips on capturing night skies and Milky Way images using his Tamron 16-30mm & 28-200mm lenses.
Author & Images: Sean Parker
Sean Parker approaches night sky photography as more than a technical exercise—it’s a deliberate blend of storytelling, patience, and connection to the landscape. Working with the TAMRON 16-30mm F/2.8 Di III VXD G2 and TAMRON 28-200mm F/2.8-5.6 Di III RXD, his methods emphasize not just capturing the Milky Way, but creating images that feel grounded, immersive, and alive. These tips reflect a thoughtful approach to shooting under the stars, where composition, timing, and awareness of the environment all come together to elevate the final image.
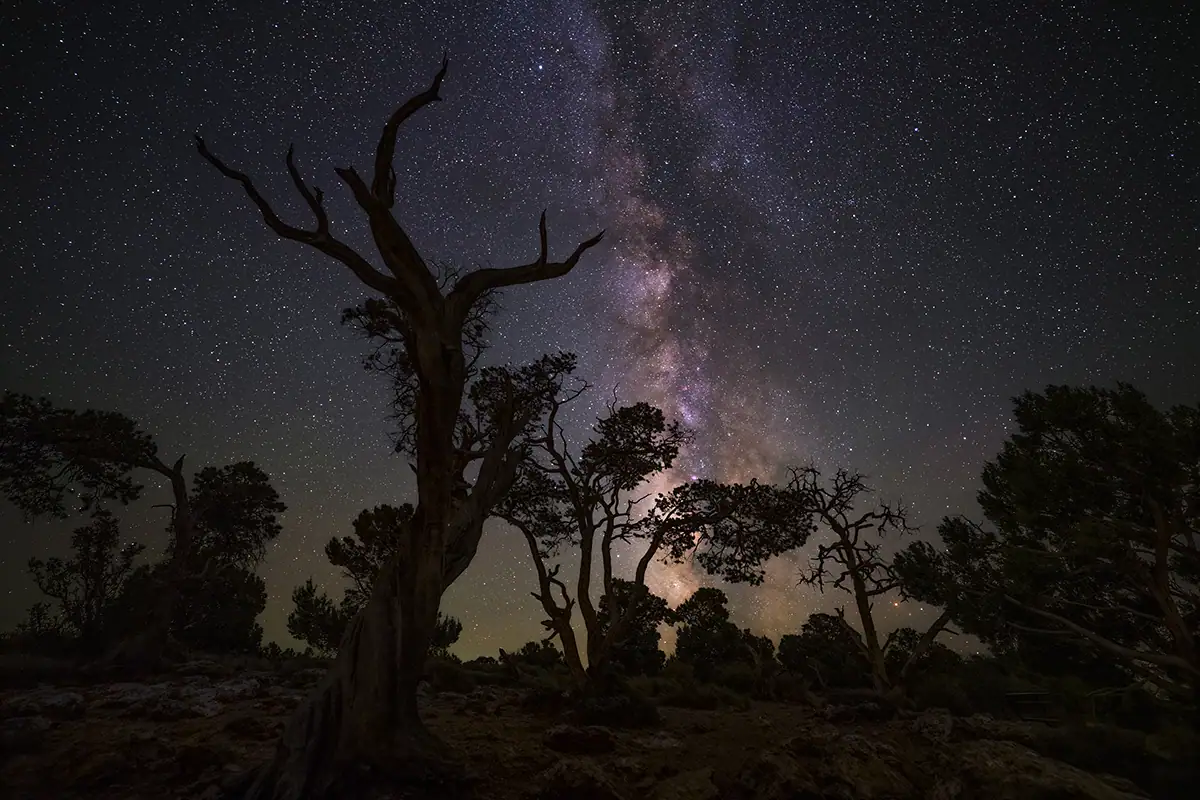
At a place like Grand Canyon, the sky is incredible! But what separates a good Milky Way shot from a memorable one is how you connect it to the land.
In this image, the twisted tree isn’t just a foreground element, it becomes the subject that gives context to the sky. Instead of asking “How do I shoot the Milky Way?” shift your mindset to:
“What in this landscape feels like it belongs under the stars?”
Out here at Saguaro National Park, the stillness is part of the experience. Once everything is set, tripod locked in, composition dialed, focus nailed…there’s a moment where you step back and just listen. No wind, no movement, just the quiet under the stars.
Using a solid tripod and remote trigger isn’t just about technical sharpness, it allows you to be hands-off and present while the camera does its job. You’re not rushing or fighting vibrations; you’re letting the scene unfold naturally over those 10–15 seconds.
There’s something powerful about knowing the image is being captured with complete stability while you’re standing there, looking up at the same sky. It slows you down, makes you more intentional, and honestly that patience shows up in the final image.
Nights like this at Saguaro National Park don’t feel static…they feel alive, slowly shifting above you. Instead of capturing just a single moment, shooting multiple frames lets you capture time itself.
For noise reduction, stacking images is the technical goal. But in the field, it feels more like building something piece by piece. You lock in your composition, hit your interval timer, and let the camera quietly fire off frame after frame while the Milky Way drifts overhead. Each shot might look similar on the back of the camera, but together they create something far cleaner and more detailed than a single exposure ever could in post processing and sometimes, you take it a step further.
Instead of stopping after a handful of frames, you let it run! Hundreds of exposures over an hour or more. That same sky that looked still at first starts to reveal motion, turning into arcs of light as the Earth rotates. The scene transforms from a snapshot into a visual record of time passing.
Standing there in the dark, watching your camera work while the stars slowly shift, you realize you’re not just photographing the night, you’re collaborating with it.
At Saguaro National Park, the darkness isn’t always absolute…and that’s not a bad thing. That faint glow hugging the horizon can be light pollution from distant towns, or natural airglow drifting through the atmosphere. Either way, it becomes part of the story if you pay attention to it.
When I’m setting up a shot like this, I’m not just chasing the Milky Way, I’m reading the horizon. Which direction feels clean and contrasty? Where is that subtle glow adding depth instead of distraction? In this image, that soft gradient near the horizon actually helps separate the silhouetted trees from the sky, giving the scene a sense of scale and atmosphere. Scout your direction before it gets dark. Know where nearby cities are and plan your composition to either avoid them or use that glow creatively as a backdrop.
Out here in Tucson during monsoon season, lightning isn’t something you chase, it’s something you anticipate. Storms build slowly over the desert, and if you position yourself right, the show comes to you.
For this shot with the Tamron 28–200mm, I framed it wide enough to capture the full structure of the storm, but tight enough to keep the strike impactful against the city below. The key is dialing in a composition before the lightning hits based on visual patterns. Watch the area where lightning has been hitting and keep firing exposures back-to-back without blowing out the highlights. This is a great method to use if you do not own a Lightning Trigger device which fires your camera for you based on IR technology.
Find the lens that’s right for you!
Loading lens comparison...