By Jenn Gidman
Images by Dave Blinder
Dave Blinder has journeyed to Mexico a few times before, but on his most recent trip to the Yucatan Peninsula, the New Jersey photographer had a new traveling companion: his Tamron 18-400mm VC ultra-telephoto lens. “I loved the versatility of the 18-400, which allowed me to shoot everything from landscapes to wildlife and people, and the sharpness on the long end of this telephoto, which is usually the weaker point of a superzoom, was impressive,” he says. “Plus it was compact enough to carry around in a small sling or bag all day while touring.”
His goal this time around: to photograph some of the abundant wildlife, as well as the more well-known landmarks, like Chichen Itza, that he hadn’t caught the first time around. And, of course, landscapes. “There were a lot of clouds during the time I was there, which is miserable for beach dwellers, but fantastic for photographers,” he says. “I would venture along the beach just to take photos of some of the apocalyptic clouds over the glowing-green Caribbean.”
Here, some of Dave’s sightseeing adventures and the photos he captured:
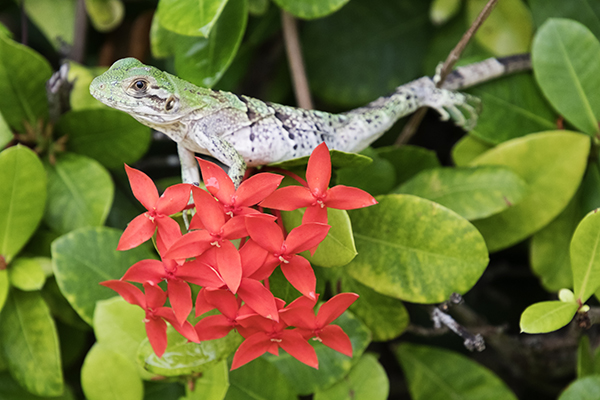
400mm, F/9, 1/400th sec., ISO 1600
One of my first stops, right off of Kukulkan Boulevard near my hotel, were the El Rey ruins, where dozens of iguanas congregate among the archaeological debris. There’s not much nature in Cancun, because it’s a built-up area, so it’s amazing to see all of these reptiles hanging out there.
The one you see here is a juvenile black spiny-tailed iguana, or ctenosaur. When it’s fully grown, it will have a mostly black stripe down its back. When I see a photo opportunity like this, with an animal so perfectly perched on a colorful background for contrast, it looks staged to me, because it’s too good to be true. The green and fuchsia are pretty much exact opposites on the color wheel, which creates a striking scheme.
I was about 20 feet away from this little guy; this photo isn’t cropped. The iguana was a bit fidgety while I was taking its picture. It would retreat into the shrub, then poke its head out again. I felt like I was photographing a game of hide-and-seek! I needed a lot of patience to finally achieve this final photo.

400mm, F/9, 1/500th sec., ISO 1600
The great kiskadee is a colorful tropical bird found throughout Central and South America. This photo follows a rule-of-thirds composition, which is what I seek much of the time when I’m framing a picture. When you’re looking at the branch, it ends about a third of the way into the frame. That leaves the upper left of the photo as open, or negative space which organizes the chaos and clutter in the lower right, making it a more aesthetically pleasing photo.
It was an overcast day, so I was able to retain details in the whites and the darks of the bird. The bird was shifting quite a bit, so setting up a tripod wouldn’t have been practical. That’s why having that Vibration Compensation (VC) feature in the 18-400 is invaluable. Without the VC, most of the photos you see here wouldn’t have been doable.
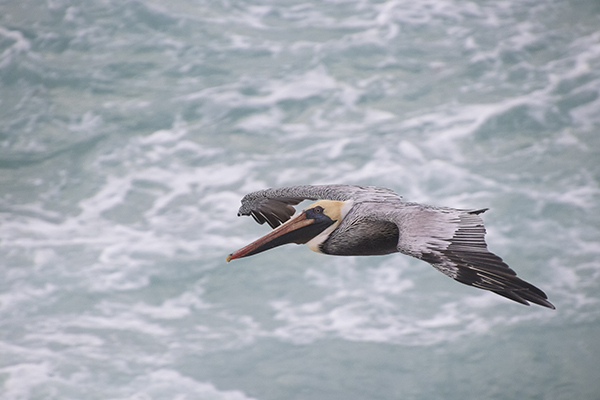
400mm, F/8, 1/400th sec., ISO 3200
I was on a cliff in Isla Mujeres, on a hiking trail along the sculpture garden, when I spotted this brown pelican. Photographers often only get a small percentage of “keeper” photos when photographing birds in flight. So the most important part of getting this image was prefocusing the lens and anticipating the bird. I had cliffs off to my right, and the pelican was flying in a repetitive pattern, so using the Servo tracking focus, I prefocused on a cliff to prepare the lens at an approximate distance I thought the bird may fly by. That’s essential, because there will always be lag time in acquiring focus. As it’s so demanding on a camera to track a moving bird, you also have to shoot in burst mode.
This was a manual exposure. I did a test photo of the cliff because panning with a bird in flight will cause the camera’s metering to shift – you could have dark water, white caps, or shadowed cliffs in the background. So I dialed in my shutter speed, aperture, and ISO values in preparation of the pelican.
You can see the very fine detail I was able to get with the 18-400. It’s a high-ISO shot, because it was an overcast day, but there’s still definition. This bird was about 35 feet from me, but the lens still resolved all that feather and eye detail.
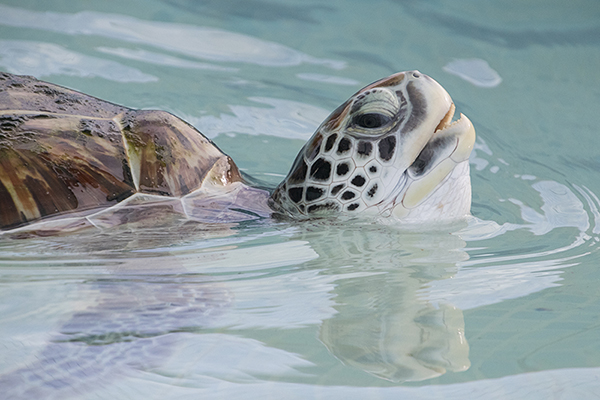
400mm, F/9, 1/1000th sec., ISO 1600
The Tortugranja turtle farm on Isla Mujeres is a win-win for nature. Because the mortality rate is so high from predators, volunteers excavate the sea turtle eggs laid all along the Caribbean coast and bring them to sandy enclosures at Tortugranja so they can get a safer head start. Then once they’re grown, they’re sent back into the wild.
In different tanks at Tortugranja, you can see everything from tiny hatchlings flapping around to fully grown sea turtles, like the one you see here. In this covered tank, there were probably three or four nearly adult turtles that were feeding. I used the 400mm end of the lens because I didn’t want to show the edges of the tank—I only wanted the blue-green water and the intricate details of the turtle’s face. The reach of the lens helped me isolate the turtle and bring out all of those details.
I used the Servo tracking focus again while in burst mode, and used a technique I call “spray and pray”. You need to shoot as many frames as possible because an animal like this will submerge just when you don’t want it to. You need to invest a bit of time to capture a photo in these conditions. If you look closely, the image is extremely detailed: You can see the sharp definition around the animal’s eye and on its shell. I know if I printed this to a 20×30, it would be a keeper.

300mm, F/10, 1/1000th sec., ISO 400
It’s important to me that, when I visit a place, I photograph people and their daily lives so that others can understand the culture and interpret it. I feel like I’m exploiting the land if I’m just there to see wildlife. By seeing local people and local customs, I feel like I’m learning something.
From Punta Sam, you can take a ferry to Isla Mujeres, and you’ll see all kinds of residents commuting to their various jobs from there. It’s a great contrast to the daily commute I see in New Jersey. These guys were just waiting for their ferry to leave, across the way from my own ferry (and they’re photographing mine, like I’m photographing theirs).
I was about 35 feet or so away from them—a distance from which a cellphone wouldn’t have been able to capture the emotions in the scene. My intended framing of this image was to show some expression on their faces, but I also wanted to show just enough of their surroundings to suggest they’re on a ferry. It’s also a rule-of-thirds shot: If you look at the uppermost head, it’s about one-third of the way down the frame, to balance out the composition. It helps organize the chaos and leads your viewers’ eyes to where you want them to go.
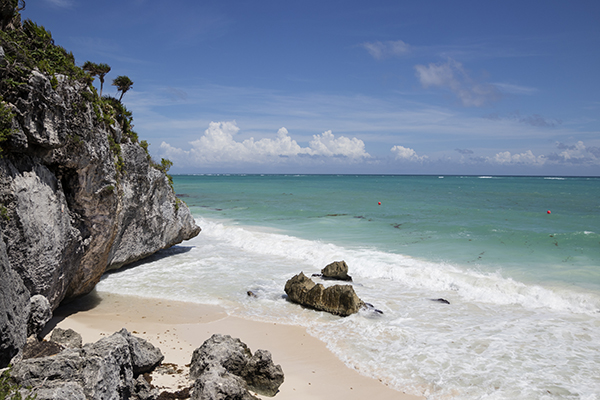
18mm, F/11, 1/250th sec., ISO 100
Visitors flock to Tulum to check out its stunning beaches and the ruins of its walled-in city, which served as a protected port. There are a few excellent vantage points once you make your way down to the beach. I basically used the golden ratio to set up this photo, which breaks it down into a 40-60 perspective (meaning the horizon isn’t halfway down the photo, nor a third, but somewhere in between). Removing the cliff from the photo would’ve taken away some of the image’s context, but I also didn’t want it to overpower the image, so I had it jut about a third of the way into the photo.
I shot in burst mode for this, and here’s why: It wasn’t really necessary in order to get a sharp photo, but by shooting this way, it allowed me to review all of my images in that series later and see how the surf is breaking. That way I could say: OK, do I need more or less sand exposed? There were some photos where there was absolutely no exposed sand, which removed a bit of the contrast. I could also see how different the various images looked in terms of what the surf was doing: If the surf was breaking in one photo, it offered a more powerful, tumultuous feel; if it was receding, it felt more peaceful.
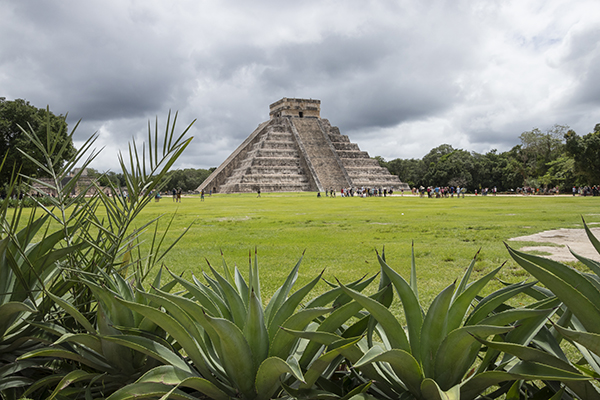
18mm, F/16, 1/250th sec., ISO 200
The centerpiece of the Chichen Itza site is El Castillo, or the Temple of Kukulkan—a Mesoamerican masterpiece. The greatest challenge of photographing the pyramid is that there’s usually a very large number of tourists, and the surrounding area is mostly matted-down green grass, which doesn’t lend itself to photographic interest. You lose that three-dimensionality when you don’t have a foreground anchor.
I was fortunate enough, however, to spot these ornamental plants just beyond the grassy area. I crouched down slightly, until the plants were just below the horizon; I didn’t want too many of them intersecting with the horizon, because it would break up the flow of the pyramid and the horizon itself. The branch, just to the left of the pyramid, serves as a guiding line leading your eye right to the pyramid, which is the icing on the cake. Anytime you can find a leading line like that, it makes the image more dynamic.
The clouds also make the shot. In a modern DSLR that’s shooting RAW, you can recover some of the shadows, but the highlights are harder. So for this photo, I underexposed a little bit, because it was important to keep that sky detail. I expose for an image like this in Aperture Priority mode usually 1/3 or 2/3 below the metering, which retains the sky detail—the foreground will be just a little bit dark and I’ll raise the shadows a bit in post-processing to bring the tonality back into the photo.

40mm, F/10, 1/500th sec., ISO 800
Chichen Itza’s Grand Ball Court recalls one of the most important recreational activities of Mayan culture. I was able to view this carving, but it was roped off, so I couldn’t get right up next to it. The versatility of 18-400 gives you so many options in how you can frame a shot like this, without ever having to move your feet. I recommend shooting your subjects at a few different focal lengths on your zoom lens so you can later pick your shots with the most impact from the comfort of your home.
I cropped the image in-camera, essentially creating a frame within a frame by using the zoom function of this lens. I shot this handheld on an overcast day, again using the VC. A stabilized lens is necessary to photograph details like this on such a day. Without it, you’d probably end up with a sloppy mess. Instead, I can actually see a face on the warrior’s earring, which is pretty incredible. The prowess of these Mayan artists and their carvings is mind-blowing, and you want to be able to show that in your photos.
To see more of Dave Blinder’s work, go to www.facebook.com/daveblinderphotography.