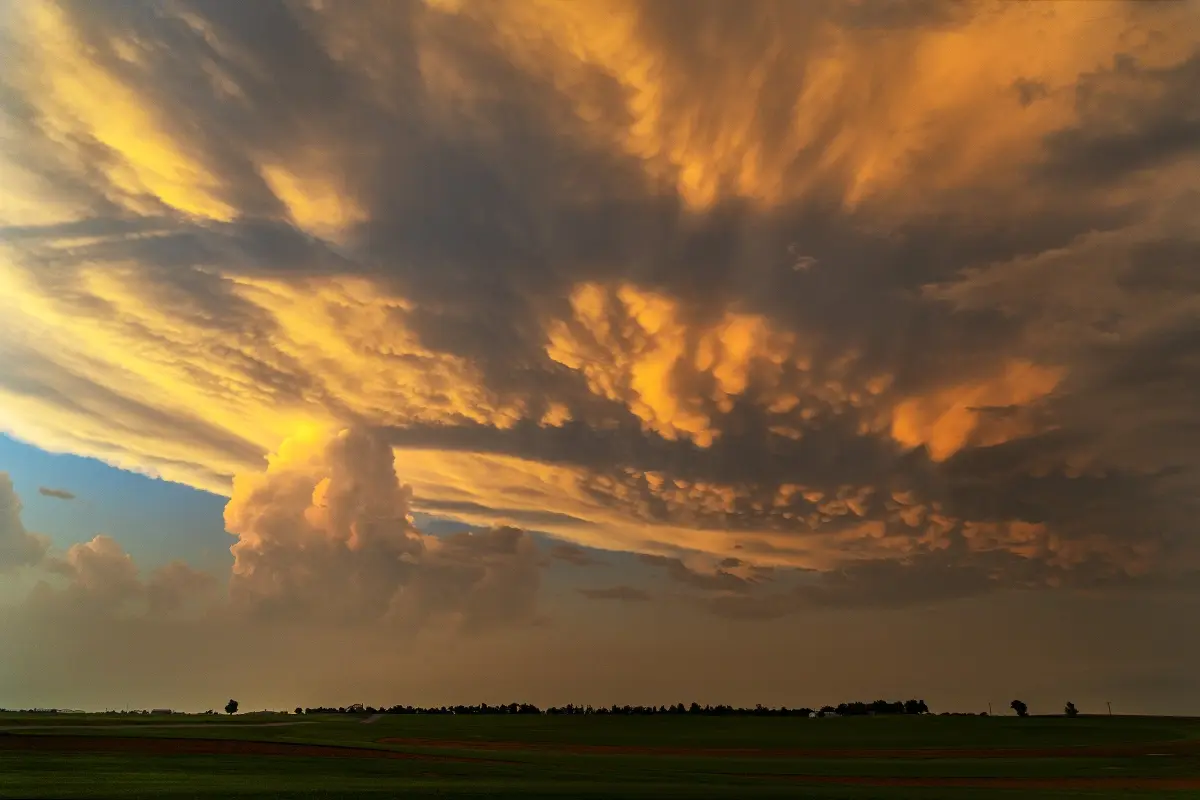
Golden hour is one of the most magical times of day to capture stunning images. Often referred to as magic hour, this brief window after sunrise and before sunset creates soft, warm light that transforms ordinary scenes into extraordinary photographs. In this article, we’ll explain what golden hour is, why photographers love it, and share expert tips to make the most of this beautiful natural light.
What You’ll Learn In This Article:
- The difference between magic hour vs golden hour
- What is golden hour and how it compares to blue hour
- Golden hour photography tips for portraits and landscapes
- How to adjust golden hour photography settings
- How to photograph during magic hour for professional results
What is Golden Hour (Magic Hour)?
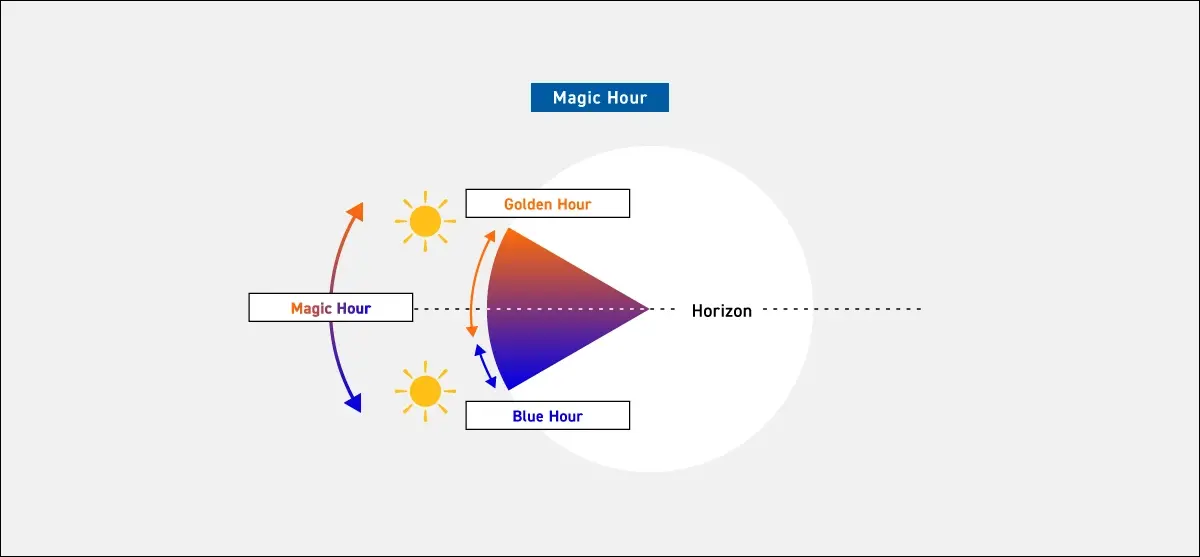
Magic hour generally includes two time periods, and you can enjoy shooting in soft, beautiful gradations of light at either time. So when you ask, what is magic hour, you could also ask what is golden hour or what is blue hour. Many photographers ask what is magic hour, since it is often used interchangeably with golden hour but can also include twilight transitions.
- Golden hour creates a warm, emotional atmosphere
- Blue hour provides a more fantastical and cool look
What Time is Golden Hour?
If you’ve ever wondered what time is magic hour, it typically occurs just before sunrise and just after sunset, overlapping with golden hour and extending slightly into twilight.
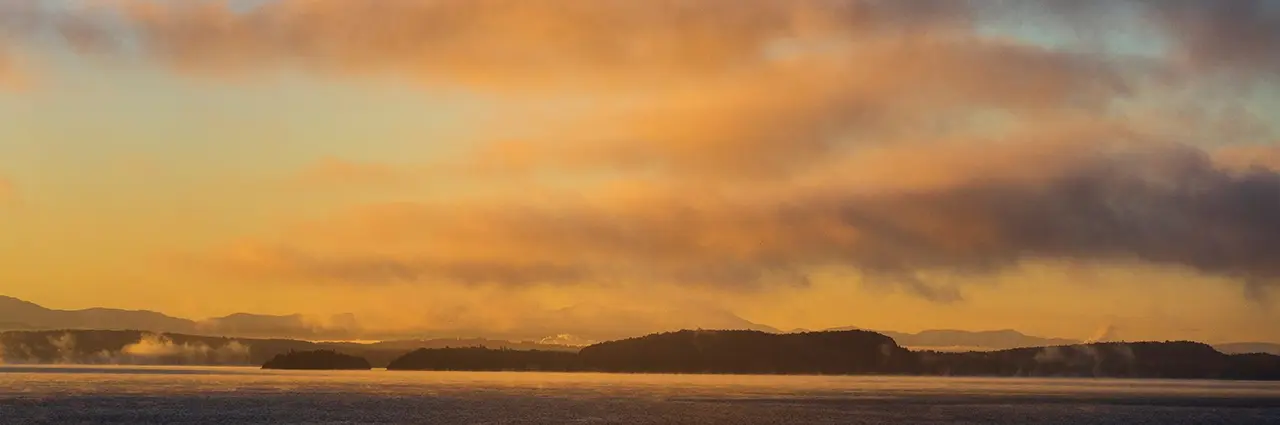
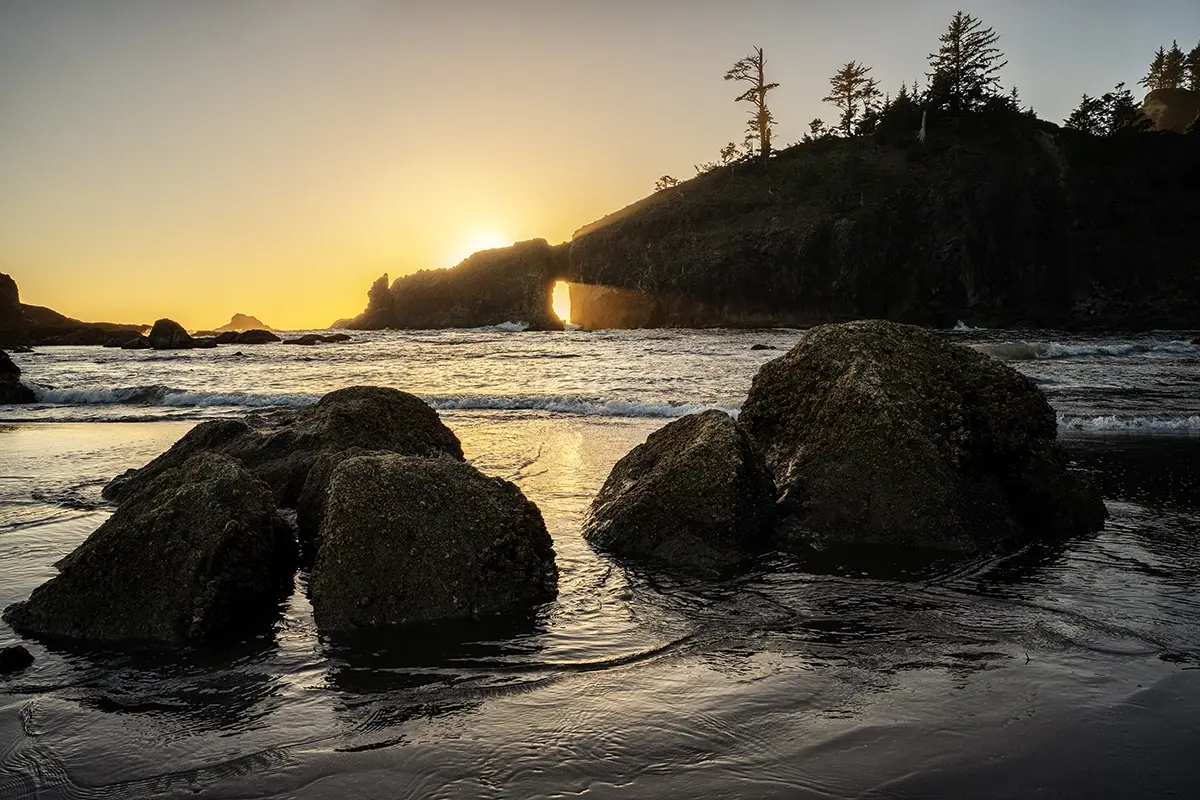
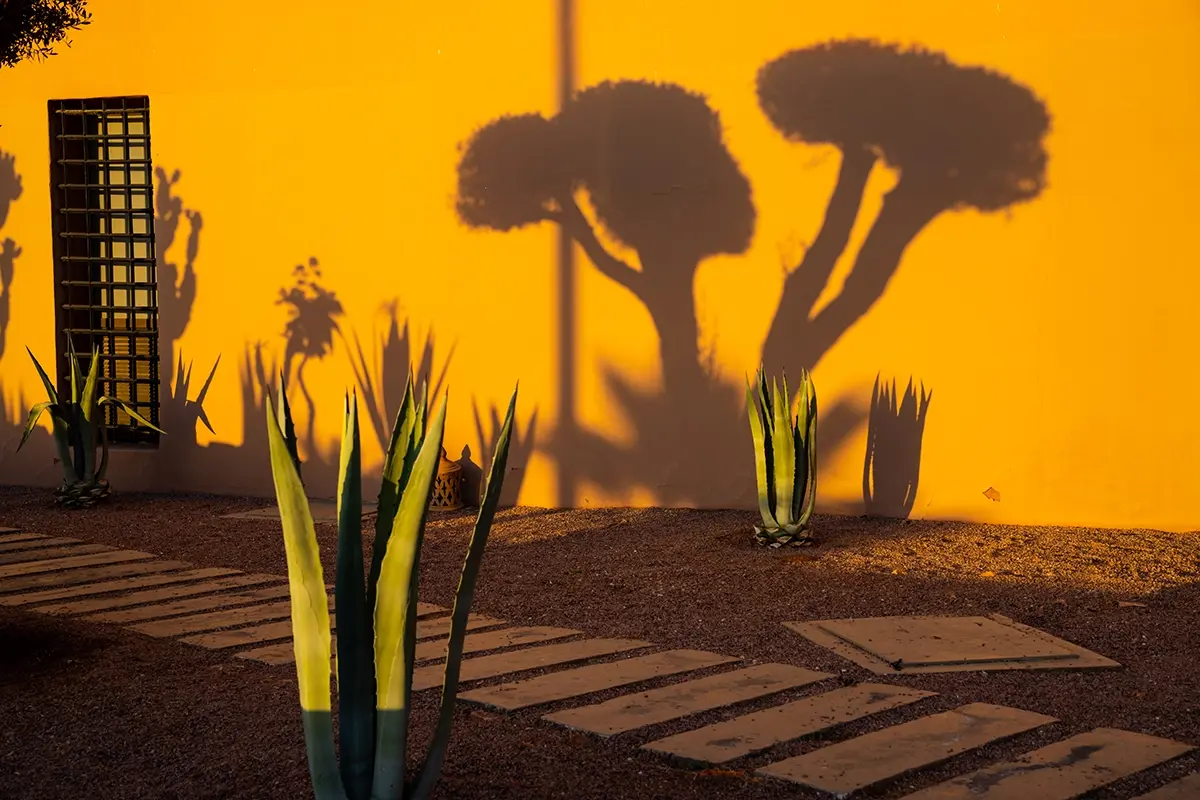
Golden hour time is the period around sunrise and sunset when the sun is near the horizon, tinting the sky orange or red. If you’ve ever asked what time is golden hour, it generally lasts about an hour after sunrise and an hour before sunset, though it can vary depending on the season and your location.
This soft light creates a gentle impression on the subject, resulting in striking golden hour photos.
When the sun’s altitude is low, sunlight travels a longer distance through the atmosphere before reaching the Earth’s surface. This process scatters blue light, giving the light that reaches our eyes a reddish, warmer hue.
Another characteristic of golden hour photography is that the sun is near the horizon, which lengthens shadows and gives the subject a three-dimensional appearance. This allows for impressive golden hour photos with a sense of depth that cannot be achieved during the day.
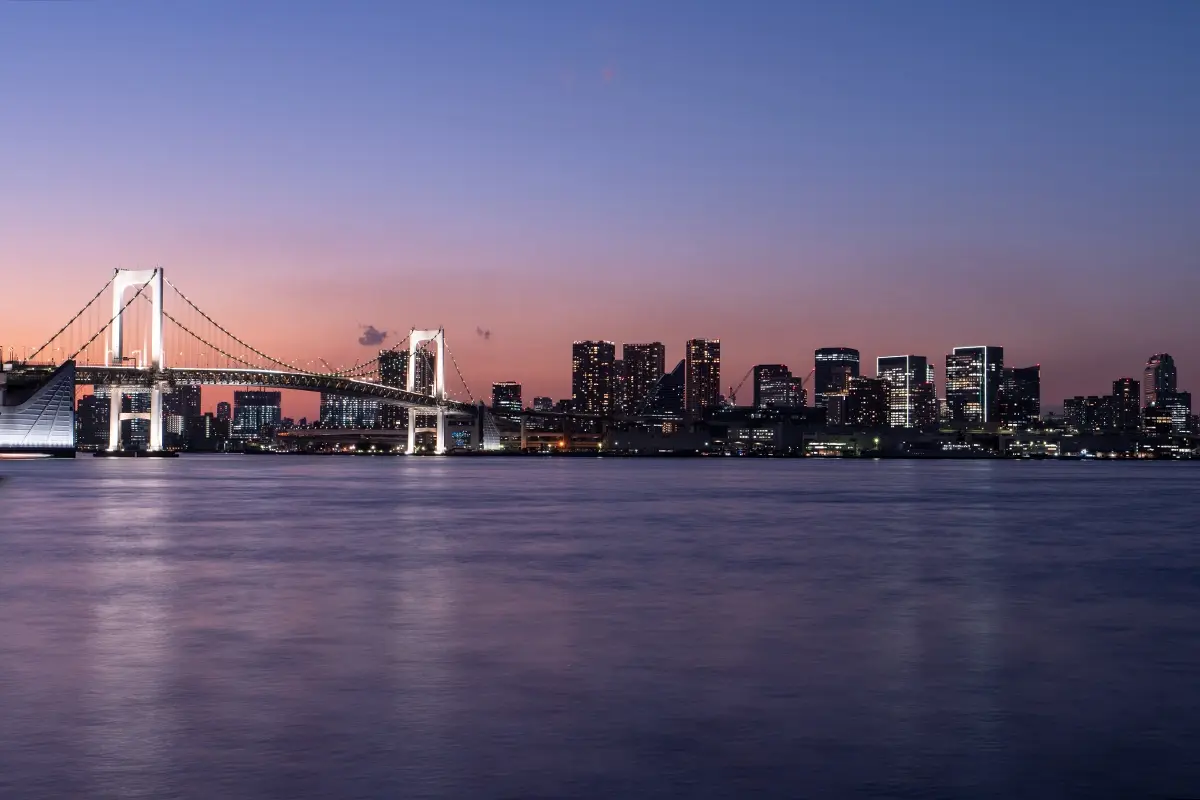
When is Blue Hour?
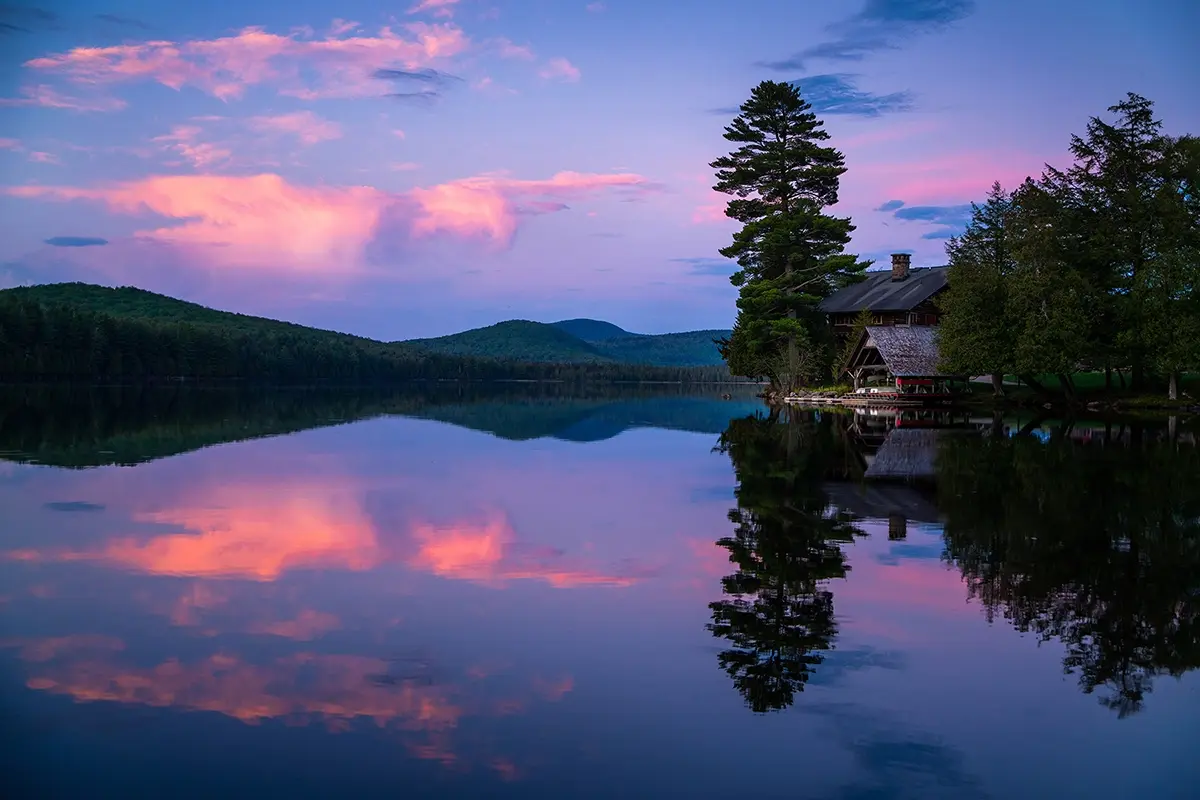
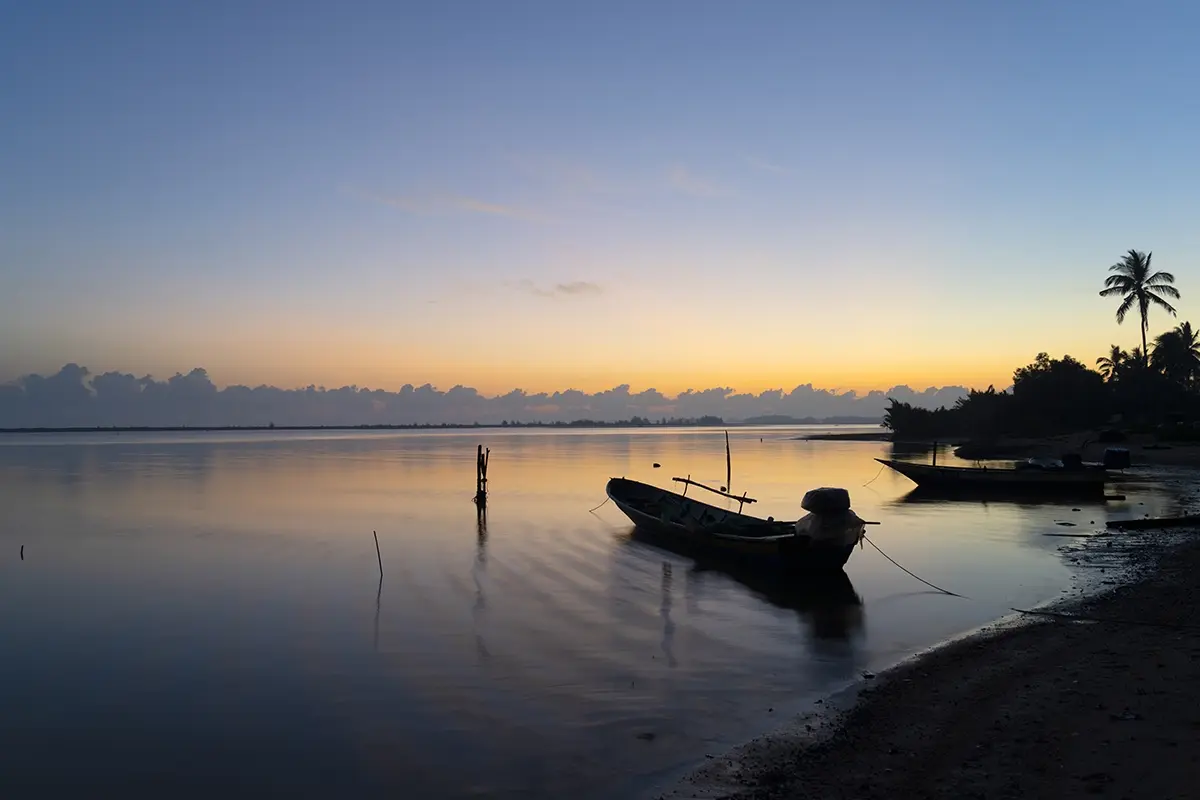
On the other hand, blue hour is the time when the sun is below the horizon, tinting the sky a deep blue or purple. Its soft blue light creates a cool, dreamy look for your subject. It’s a popular time of day for capturing striking landscapes and cityscapes.
When the sun sinks below the horizon, less sunlight reaches the sky directly, and only blue light scattered through the atmosphere reaches our eyes. This phenomenon tints the sky a cool, deep blue or purple hue, creating a tranquil, dreamy atmosphere.
Furthermore, since the brightness of the sky and the brightness of artificial light are in balance during this time of day, illuminated cityscapes and buildings stand out even more. Taking advantage of this time of day allows you to capture cool, sophisticated images that are different from those captured during the day.
Golden Hour Photography Tips
From here, we will introduce some golden hour photography tips for making the most of this light.
Preparation
Since time is limited during magic hour photography, preparation is essential.
- Scout the location and use apps: Scout the location in advance to confirm the direction of the sun and the time of day when you can see the ideal view. Check golden hour time using a smartphone app or a golden hour photography calculator.
- Check the weather forecast: Additionally, the appearance of the light changes depending on the weather and humidity, so be sure to check the weather forecast.
- Arrive early: Arrive at the location 30 to 60 minutes before magic hour to be sure you have enough time to setup. And this will allow you to enjoy the view while you are shooting.
Golden Hour Photography Settings
Exposure settings are important to capture the light of the magic hour beautifully. Adjust the golden hour photography settings as follows to suit the lighting conditions, which change over time.
Use Aperture-Priority Shooting Mode
First, try shooting in aperture priority mode. In this mode, you set the F-number (aperture value) yourself, and the shutter speed is automatically adjusted to achieve the correct exposure. In this mode, you can easily adjust exposure using the exposure compensation dial.
Use an F-number (Aperture Value) Appropriate for Your Subject
- Landscapes: Set the F-number according to the image you want to capture. For landscape photography, you want to capture the entire landscape sharply, so a setting of around F8 to F11 would be a good guide. However, since there is relatively little light during the magic hour, you need to be careful not to underexpose by stopping down the aperture too much. Use a tripod and boost the ISO if necessary.
- Portraits: On the other hand, when photographing portraits or other subjects that emphasize the subject, you can achieve beautiful bokeh by using an F-number close to the maximum aperture, such as F2.8 or F4.
Shutter Speed
To minimize camera shake and obtain a sharp image, it is recommended to adjust the shutter speed to around 1/125 to 1/250 seconds. If you are using a tripod for night photography, you can select a slower shutter speed of a few seconds.
ISO Sensitivity
To get the clearest image quality with as little noise as possible, try shooting at a sensitivity of around ISO 100 to ISO 400. However, as mentioned above, there is often a lack of light during magic hour, so if the image appears dark, increase the ISO sensitivity to 1600 or 3200.
Exposure Compensation
During magic hour, there are many scenes where the difference between light and dark is large due to backlighting and other factors. This is where your exposure compensation dial comes in handy.
- Positive exposure compensation: If the subject appears dark and gloomy in a portrait, for example, try adding positive exposure compensation to capture the details of their expression.
- Negative exposure compensation: Conversely , if you want to emphasize the silhouette or create a more subdued atmosphere, adding negative compensation is an effective technique.
Adjusting the Color With White Balance
White balance can also be used to broaden the range of golden hour photography hour expression. Start by shooting with auto white balance and aim for a natural look. Once you become more familiar with photography, we recommend changing the white balance to explore your preferred expression.
- Intensify reds: Setting your white balance to “Cloudy” will intensify the reddish tint, further emphasizing the warm hues unique to golden hour photography definition.
- Emphasize blues: Alternatively, setting it to “Tungsten light” will emphasize the blue, making the mysterious blue of blue hour even more impressive.
If you want to create more professional-looking works, shooting in RAW format will allow you to flexibly adjust white balance and exposure compensation during development.
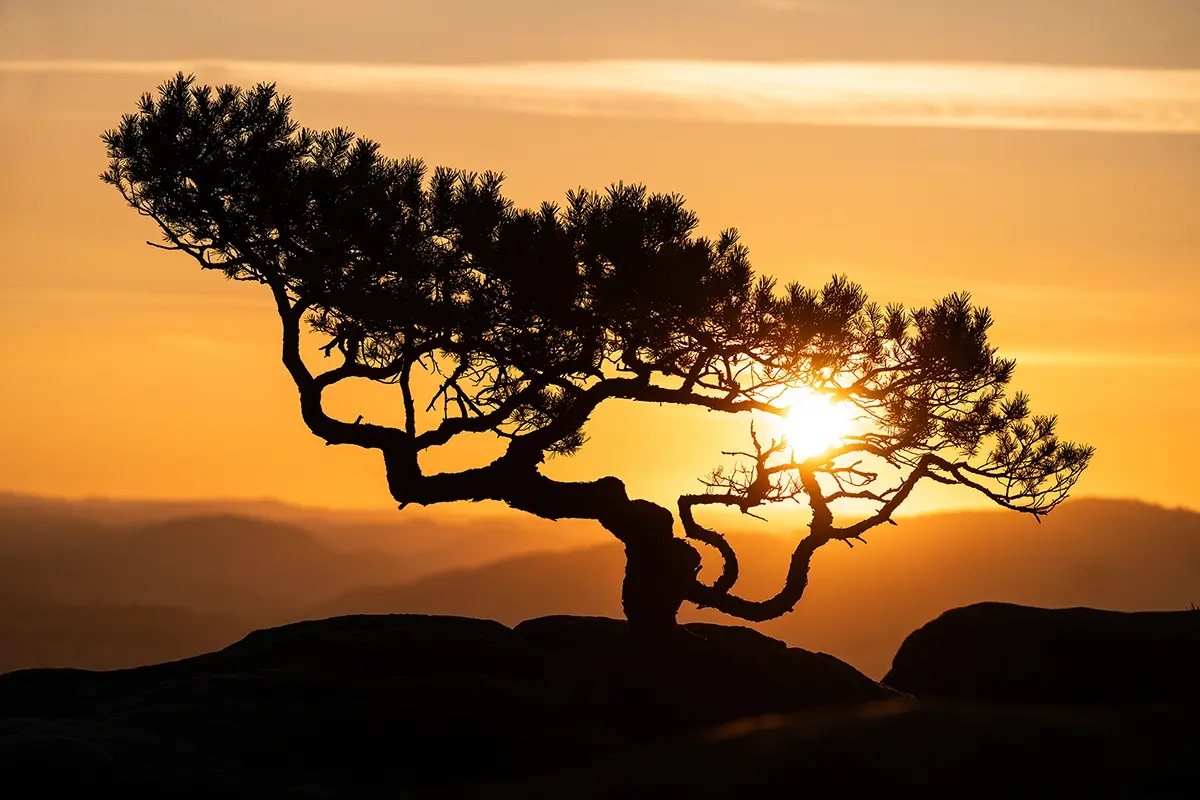
Create a Warm Light With Backlighting During Golden Hour
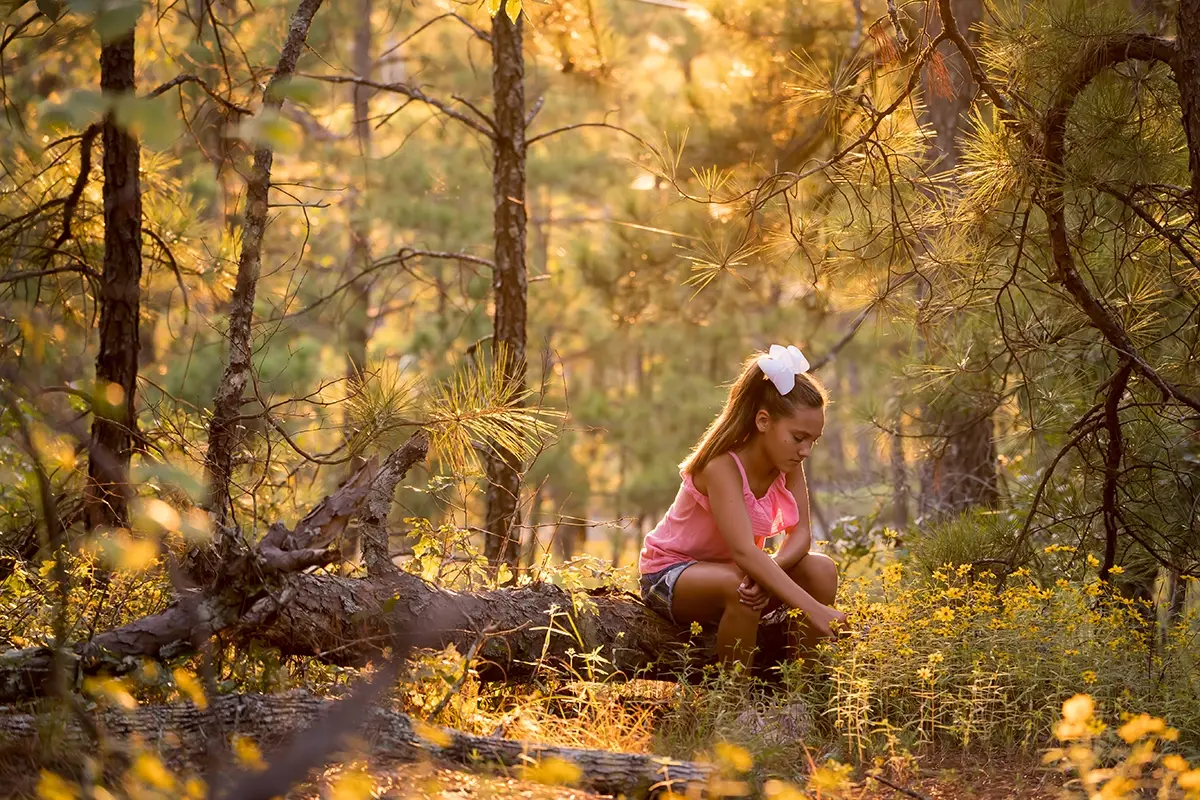
Shooting a backlit subject during golden hour photography creates a more striking effect of light. This is because light appears scattered around the subject during golden hour, creating a radiant appearance. This is particularly recommended for portraits and architectural photography, as it can soften the subject’s impression and create a nostalgic atmosphere.
Create Ethereal Drama During Blue Hour
Shooting with backlight during blue hour creates a dreamy, mystical impression as the light overlaps the deep blue background and the subject’s outline. In scenes with artificial light, the light from buildings and streetlights acts as an accent, highlighting the subject. The soft blue light of this time of day can be used to create a sense of tranquility and sophistication, making it ideal for landscape and portrait photography.
Composition
The beautiful light of magic hour can be further enhanced by composition.
Rule of Thirds
The rule of thirds lets you achieve balance by dividing the screen into thirds vertically and horizontally and placing the subject and sub-subject near the intersections. For example, when photographing a beach at sunset, you can capture a balanced image of the crimson sky by placing the horizon in the bottom third of the screen.
Diagonal composition
Diagonal composition is a composition in which the subject or sub-subject is placed on the diagonal of the screen. This arrangement has the effect of creating a sense of three-dimensionality and movement in the photo. For example, try using a building, road, or tree shadows to guide the eye from one edge of the screen to the other.
The contrast between the sky at dusk and the scenery on the ground creates a dramatic shot. Also, ascending diagonal lines create a sense of openness, while descending diagonal lines create a sense of stability, so use them depending on the image you want to capture.
Hinomaru Composition
A Japanese flag composition that places the subject at the center of the image, can express the subject’s impression powerfully and directly. For example, by placing the setting sun or a backlit silhouette at the center, you can create a simple yet emotionally appealing photograph.
Create Depth During Golden Hour
One of the most powerful techniques in in golden hour photography is using a wide-angle lens to create depth in your landscapes, drawing viewers into the scene with a more immersive and dynamic feel. Create depth with a wide-angle lens by placing subjects such as rocks, trees, or buildings in the foreground.
Tips For Taking Portraits, Landscapes, & More in Golden Hour
The emotional light of magic hour photography brings out the charm in a variety of subjects.
Portraits

Try taking backlit portraits during golden hour photography sessions. Hair and outlines will shine golden, creating a dreamlike effect. Soft light will also portray skin and facial expressions with a natural texture. If the facial expression is too dark, adjust the exposure compensation to add more light to the exposure.
Also, try to make use of white space by using the rule of thirds, etc. Not only close-ups of people, but silhouettes can also create a dramatic atmosphere in photos.
Landscape
Using a wide-angle lens allows you to capture the beautiful gradations of the sky and the scenery on the ground that are unique to magic hour photography.
Evening
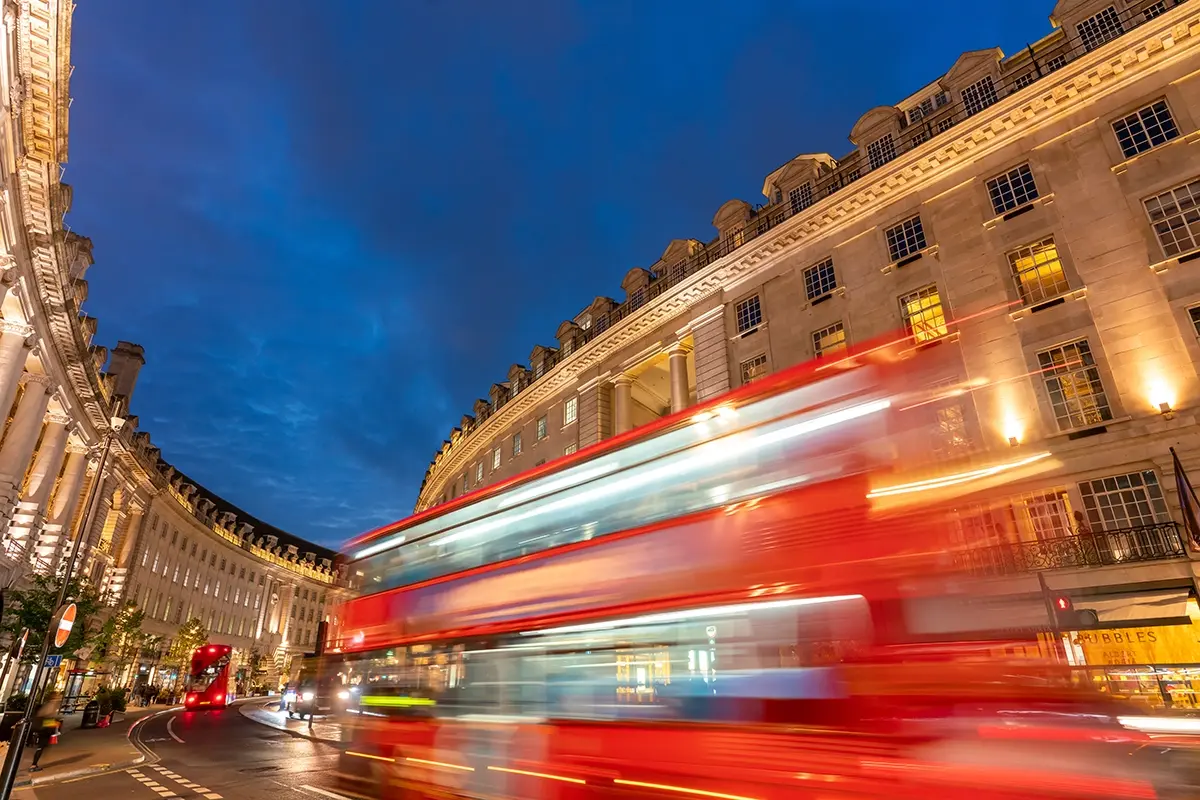
Magic hour is also the best time to photograph night scenes and nightscapes, from dusk into the night. It’s a good idea to consider the contrast between the lights of buildings and street lamps and the twilight sky when composing your shot. Shooting with a tripod and long exposure allows you to capture even weak light clearly. You can also capture the light trails of cars passing by on the road.
Everyday Snapshots
When taking snapshots, it’s a good idea to observe the patterns and contrasts created by the sunset light and shadows, as well as the shadows that appear on the subject’s surface. Composing a shot with side light can create an impression that can’t be felt in daytime light.
Also, using backlighting to capture a silhouette can create an emotional atmosphere with the contrast against the reddish light. By incorporating the long shadows that are unique to this time of day into your composition, you can also create a narrative expression.
Takeaway: These compositions allow you to capture breathtaking golden hour photos that emphasize contrast, warmth, and depth.
Automobiles and Other Vehicles
Magic hour light is also effective when photographing vehicles such as cars, trains, and airplanes. The diagonal light beautifully illuminates the contours of the vehicle, making the surface texture even more appealing.
For example, when photographing an airplane, the sunset reflected on the body creates a striking accent. By creating a contrast between the runway, lights, and nature, you can create a dynamic image in a quiet twilight scene.
Points to Consider When Choosing a Lens
Here are some tips for choosing a lens. Choose a lens that matches the scene you want to capture and can vividly capture the beautiful light of magic hour, whether golden hour or blue hour.
Maximum Aperture
Since magic hour is a time when light is scarce, a lens with a small maximum aperture value makes it easier to take brighter photos even in dark environments. Also, by shooting with a wide aperture and incorporating a large amount of background blur, you can create a fantastic atmosphere at dusk.
Focal Length
Choose a lens with the appropriate focal length depending on the subject you are shooting and what you want to express.
Wide-angle lenses are suitable for landscape photography, allowing you to capture the vastness of sunset skies and ground scenery. Telephoto lenses can capture the details of distant buildings, vehicles, and mountain ranges, and can make use of beautiful bokeh in portrait photography. Standard lenses have a natural angle of view close to the human field of view, making them ideal for street snapshots and portraits.
Choose a lens by understanding the characteristics of these focal lengths.
Lightweight and Compact
When photographing during the magic hour, you often move around from location to location, so the portability of the lens is also an important factor. A lightweight and compact lens is especially useful when traveling, walking around town, or shooting at popular photography spots. If possible, try holding the lens in your hand to check its weight.
Autofocus Performance
When it comes to autofocus (AF), make sure that you can focus on the target subject without any stress and that it is easy to focus even in dark environments. Also, if you often photograph moving subjects such as people or vehicles, it is important to choose a lens with high motion tracking performance.
Image Stabilization Mechanism
If a lens is equipped with an image stabilization mechanism, it’s easier to take photos with less camera shake. During magic hour when there is often insufficient light, using slower shutter speed is necessary, so this is an important function if shooting handheld.
Recommended Tamron Lenses for Golden Hour Photography
Tamron offers a wide range of lenses, from wide-angle lenses to telephoto lenses and all-in-one zoom lenses. All-in-one zooms combine high resolution with lightweight and compact design, making them easy to use even for beginners. Furthermore, their excellent optical design and coating technology enable you to take photos with minimal flare and ghosting, even in backlit situations.
Here are some lenses to consider for golden hour photography:
All-In-One Lenses
- Tamron 18-300mm F/3.5-6.3 Di III-A VC VXD (Model B061) for Sony E, Canon RF, Fujifilm X, and Nikon Z APS-C cameras
- Tamron 28-200mm F/2.8-5.6 Di III RXD (Model A071) for Sony E full-frame cameras
- Tamron 28-300mm F/4-.71 Di III VC VXD (Model A074) for Sony E full-frame cameras
Wide-Angle Lenses
- 11-20mm F/2.8 Di III-A RXD (Model B060) for Sony E, Canon RF, and Fujifilm X APS-C cameras
- 16-30mm F/2.8 Di III VXD (Model A064) for Sony E and Nikon Z full-frame cameras
- 17-50mm F/4 Di III VXD (Model A068) for Sony E full-frame cameras
Standard Lenses
- 17-70mm F/2.8 Di III-A VC RXD (Model B070) for Sony E, and Fujifilm X APS-C cameras
- 20-40mm F/2.8 Di III VXD (Model A062) for Sony E full-frame cameras
- 28-75mm F/2.8 Di III VXD G2 (Model A063) for Sony E and Nikon Z full-frame cameras
- 35-150mm F/2-2.8 Di III VXD (Model A058) for Sony E and Nikon Z full-frame cameras
Telephoto Lenses
- 50-300mm F/4.5-6.3 Di III VC VXD (Model A069) for Sony E full-frame cameras
- 50-400mm F/4.5-6.3 Di III VC VXD (Model A067) for Sony E and Nikon Z full-frame cameras
- 70-180mm F/2.8 Di III VC VXD G2 (Model A065) for Sony E and Nikon Z full-frame cameras
- 70-300mm F/4.5-6.3 Di III RXD (Model A047) for Sony E and Nikon Z full-frame cameras
Summary: Capture the Beauty of Golden Hour (Magic Hour)
Magic hour is a special time of day when you can enjoy a beautiful gradation of light. By taking advantage of the soft, warm light and the brief deep blue that appears between it, even an ordinary scene can be transformed into a striking photograph.
We encourage you to put these golden hour photography tips into action to capture the beautiful world of light that is unique to magic hour photography. By following these essential golden hour photography tips, you’ll maximize your results whether shooting portraits, landscapes, or cityscapes.
Ready to explore golden hour photography? Start with the right lens. Explore Tamron lenses at an authorized Tamron dealer near you or shop now at the official TAMRON Store.