Photographing the Badlands with Tamron lenses while leading a photography tour in late June was an unforgettable experience—equal parts inspiring and humbling. The rugged formations, shifting light, and remarkable biodiversity made every early morning and late evening worthwhile. Each time I return to photograph Badlands National Park on my own or to teach students how to photograph the Badlands, I find a rich canvas filled with grand vistas, intimate scenes, and just the right amount of wildlife to keep me on my toes.
In this article, I’ll share the techniques, gear choices, and timing strategies that helped me make the most of my time in the park. From choosing the best lenses for national park photography to understanding wildlife behavior and tracking weather patterns, here are my top tips for photographing the Badlands like a pro.
Por colaborador convidado Alyce Bender
O que você aprenderá nesta postagem do blog:
- What versatile lenses are best for capturing everything from landscapes to wildlife in Badlands National Park.
- How to track weather conditions to plan safely and maximize chances of dramatic light.
- Tips to develop essential field techniques and workflow for both landscapes and wildlife.
- The importance of respectful and ethical wildlife photography.
- Why arriving early and staying late is key to capturing dynamic landscape images.
Gear Up: The Right Tools for the Job

When it comes to travel photography in national parks, packing light but smart is key. The Tamron 18-300mm variable zoom lens quickly became my MVP on this trip. Offering a huge focal range in a compact body, it allowed me to transition smoothly between wide-angle landscape shots and close-up wildlife portraits without changing lenses—essential in dusty, windy environments like the Badlands.
For sweeping views at sunrise or layered ridgelines in golden hour light, the Tamron 18-300mm at the 18 to 24mm focal lengths worked beautifully. Later in the day, when a bison suddenly charged across the grasslands to catch up with its herd, I was able to zoom all the way to 300mm—capturing the motion and power of the moment in a dynamic ICM image, without sacrificing image quality.
A lightweight yet sturdy tripod, such as one from Benro, helped stabilize my compositions during low light hours, especially when working with slower shutter speeds to capture cloud movement or soft, pastel evening skies. In such wind-prone terrain, having a tripod that’s compact for hikes and air travel but solid when locked down is a major advantage.
What Lens Should I Use to Photograph the Badlands?

For most travelers and even seasoned pros, a versatile zoom like the Tamron 18-300mm is an excellent all-in-one solution, offering the flexibility to adapt to ever-changing subjects and conditions — from wide landscapes to distant wildlife — all in a single, compact lens. Even photographers working with full-frame mirrorless bodies like the Sony A1, as I do, can take full advantage of this lens by switching into APS-C “crop mode.”
While this technically results in a smaller file size, I’ve found that the versatility, compactness, lightweight design, and quality build of the Tamron 18-300mm far outweigh any concern over pixel count. In fact, I shoot in crop mode most of the time regardless of which lens I’m using, because it gives me access to a broader range of lenses and focal lengths without sacrificing my workflow or gear weight balance.
What Other Lenses Should I Consider Using to Photograph National Parks?

In addition to the 18-300mm, I also carried Tamron’s 17-50mm F4 and 50-400mm lenses, both of which proved to be powerful tools in my Badlands kit and are both built for full-frame sensors. The 17-50mm quickly became my go-to for wide-angle scenes—ideal for capturing the park’s expansive vistas, layered geologic formations, and even some early morning blue hour work. On the opposite end of the range, the 50-400mm delivered incredible reach for isolating wildlife and compressing distant ridgelines into striking graphic compositions.
Despite their broad focal ranges, both lenses remain surprisingly lightweight and compact, making them easy to manage for air travel, long hikes, or when switching setups in the field. For those looking to cover an impressive range with just two lenses, the Tamron 17-50mm and 50-400mm pair perfectly—like bookends to a beautifully versatile system. Having this trio of Tamron lenses gave me the flexibility to respond creatively to every scene the Badlands threw my way.
My National Park Gear Summary:
- Um tripé resistente
- Tamron 18-300 mm F/3.5-6.3 Di III-A VC VXD (available for Sony E, Canon RF, Fujifilm X, and Nikon Z mirrorless cameras)
- Tamron 17-50 mm F/4 Di III VXD (available for Sony E full-frame mirrorless cameras)
- Tamron 50-400 mm F/4.5-6.3 Di III VC VXD (available for Sony E and Nikon Z full-frame mirrorless cameras)
TIP 1: Watch the Weather (and Work With It)

One of the most overlooked national park photo tips is learning how to read the sky—before you ever lift your camera. In the Badlands, dramatic weather systems can transform a bland scene into a masterpiece in moments. Using apps like Windy, I tracked approaching thunderstorms, wind direction, and cloud layers to anticipate dramatic skies and diffused light.
Tracking the weather in the Badlands isn’t just about chasing dramatic skies, it’s also a critical safety consideration. The park’s wide-open terrain offers little to no natural cover, and spring and summer storms can escalate quickly, bringing large hail, damaging winds, and intense lightning.
TIP 2: Use Weather Apps for Photographic Potential e to Keep You Safe
Utilizing Windy and another app called RadarScope are not just for photographic potential, but to ensure I have time to reach shelter if conditions turn dangerous. When I see thunderheads building I start watching my apps much closer. Hearing distant rumbles makes me really start weighing my safety risk/rewards. No image is worth my health or even potentially my life.
If you are not well versed in wilderness safety and weather reading, don’t wait—start heading back to your vehicle or designated shelter immediately. In the Badlands, awareness and timing can mean the difference between capturing a storm and getting caught in one.
One morning at sunrise, a fast-moving storm swept across the region, and I closely monitored the radar using Windy to track its path in real time. The app’s detailed cloud layer predictions gave me just enough confidence to head to our planned shoot location, which looked like it would sit just outside the storm’s main track. Sure enough, we stayed clear of all but a few random rain drops, and as the system moved off to the east, breaks in the cloud cover began to appear.
The result? A dramatic sunrise show filled with shifting light, glowing edges on the storm front, and a sky that lit up in fiery hues—a perfect blend of risk, planning, and a little weather-savvy luck. It’s a reminder that sometimes the best conditions come wrapped in a little uncertainty—and knowing how to read the sky makes all the difference.
TIP 3: Don’t Shy Away From So-Called “Bad” Light
Bright, sunny days in the Badlands can offer bold contrast and crisp light—perfect for showcasing the park’s dramatic textures and sculpted formations. Mid-morning and late afternoon are especially good times to work with angled light that enhances the depth and contours of the landscape. However, be mindful of heat shimmer and atmospheric distortion, which can become a real issue during warmer hours, especially when shooting across open grasslands or toward distant subjects.
This is particularly important for wildlife photography, as heat waves can blur fine details and make it difficult to achieve sharp focus on animals like bison, pronghorn, or burrowing owls in the distance. To counteract this, I often focus on subjects that are closer, in partial shade, or wait for cooler morning and evening windows when wildlife is more active and atmospheric distortion is minimal. And of course, while chasing the light, don’t forget to take care of yourself — hydration and sun protection are just as essential as your gear in the summer sun.
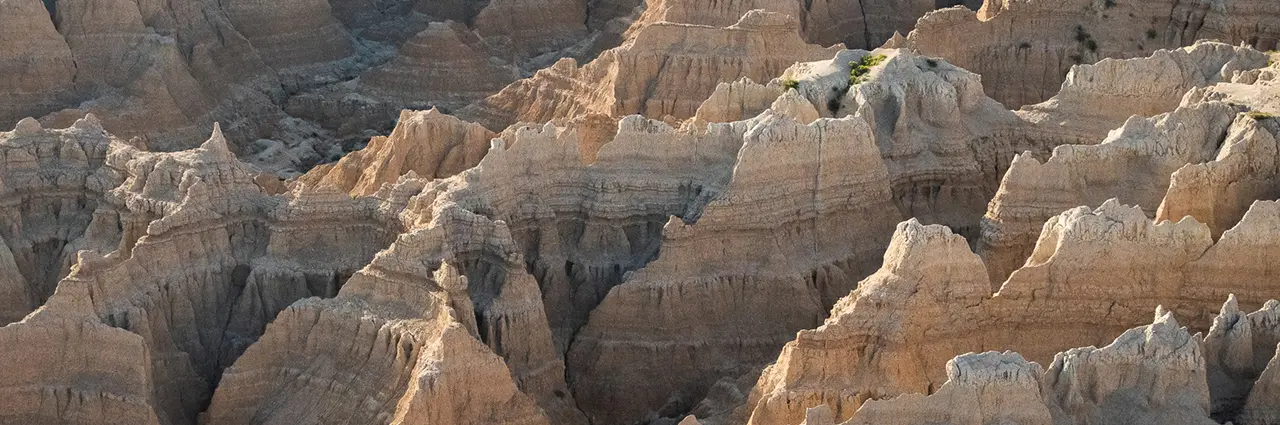
TIP 4: Work the Subject: From Grand Scenes to Intimate Details
One of the most rewarding lessons I’ve learned in my photography career is to work a subject completely. In the Badlands, that means not only capturing the jaw-dropping overlooks but also paying attention to subtle shifts in light, color, and pattern.

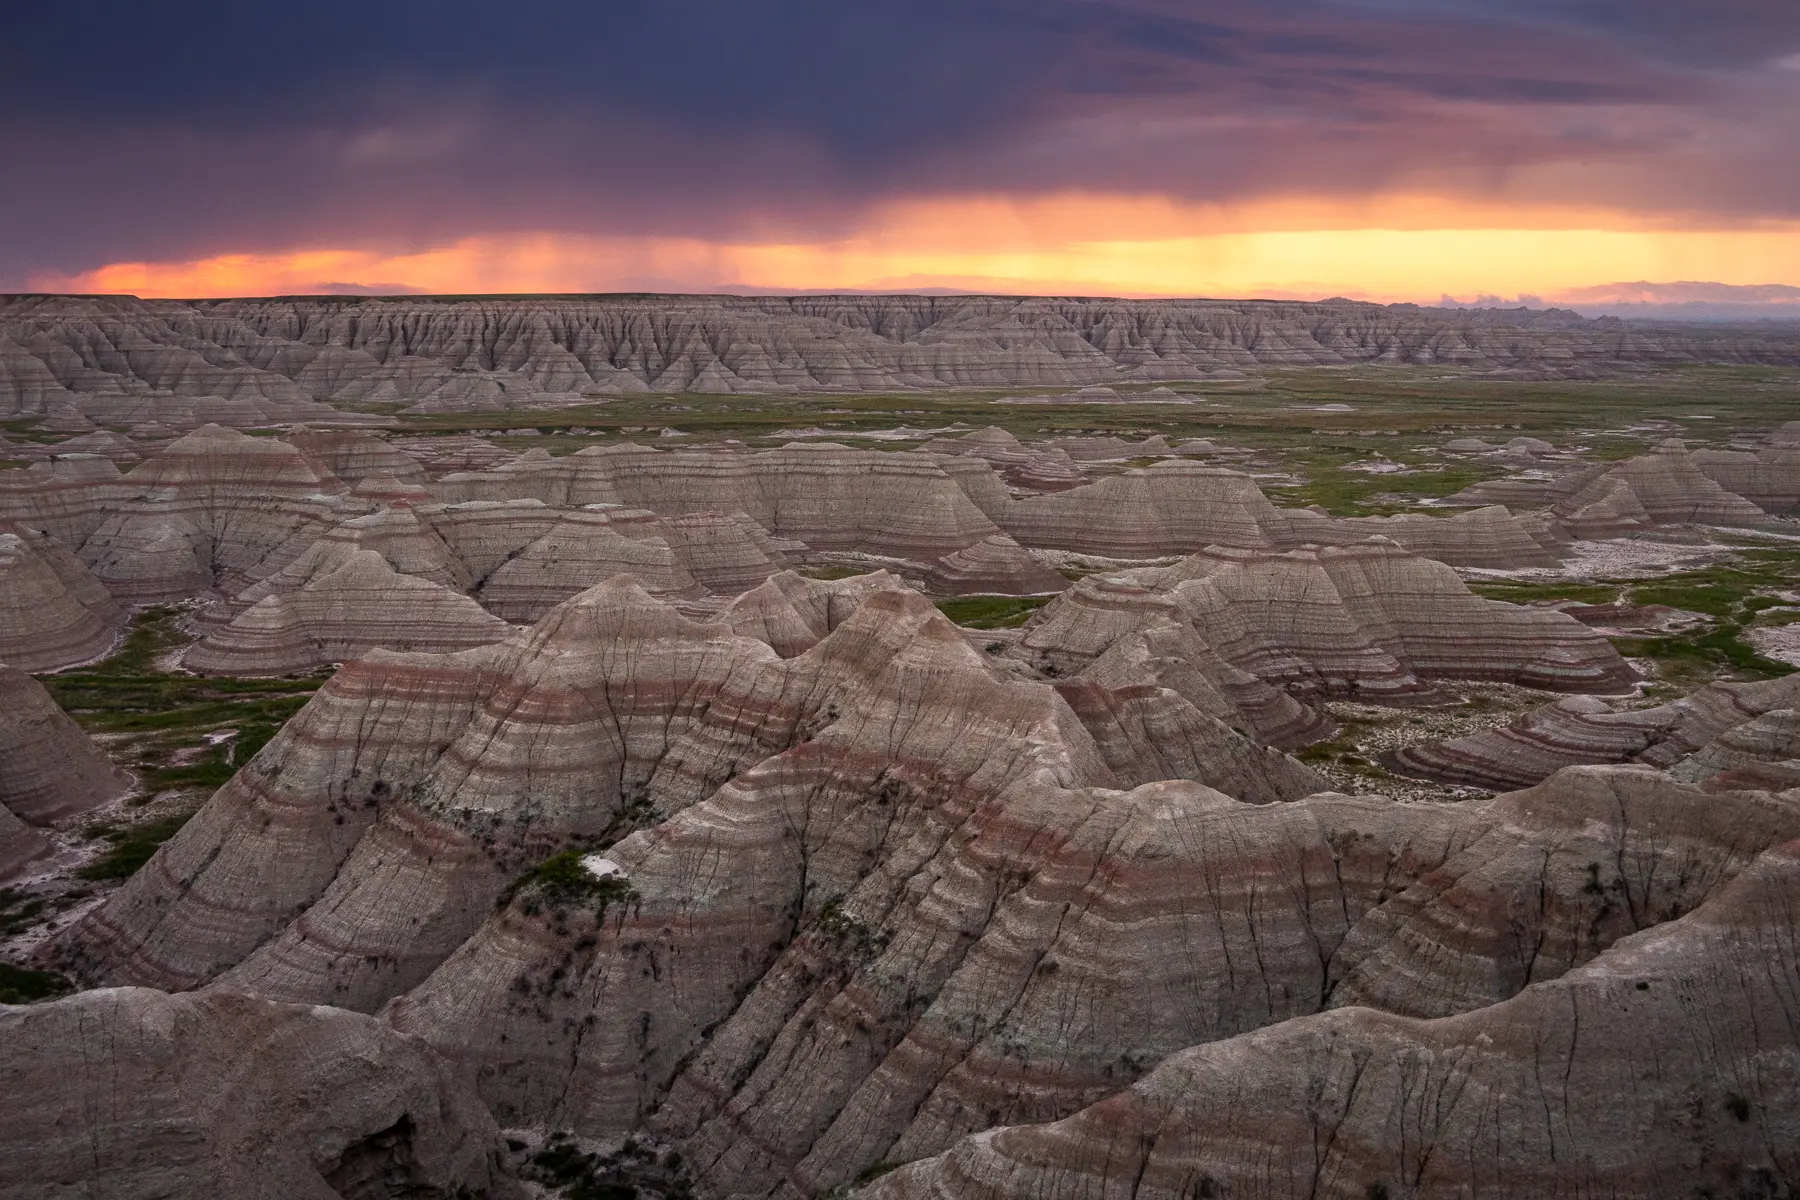
For example, I began the morning with wide-angle compositions at dawn, using a wide focal length to frame the vast expanse of the valley bathed in early light.

As the sun climbed and began to rake across the terrain, I shifted my attention to a more intimate landscape—a cluster of softly contoured painted hills glowing in pastel tones, their colors gently blending like a watercolor wash.

Later, I zoomed in even further to explore abstract details, including the intricate patterns of cracked mud underfoot—tiny mosaics etched by time and weather that offered a surprising counterpoint to the park’s grander scenes. Each shift in scale revealed a new way to experience the Badlands, reminding me that sometimes the smallest features tell the most unexpected stories.
All three images were captured within roughly 100 feet of each other, showcasing just how much creative variety can be found in a single stretch of Badlands terrain. From wide landscapes to intimate scenes and abstract textures, the key was slowing down and exploring the details with intention. Sometimes, the most compelling stories are waiting right under your feet.
How to get the best photos in the badlands? It’s not just about golden hour or the most famous overlook. By staying open to the possibilities in every scene, I walk away with a far more dynamic and personal portfolio.
TIP 5: Respect and Understand the Wildlife In the Badlands
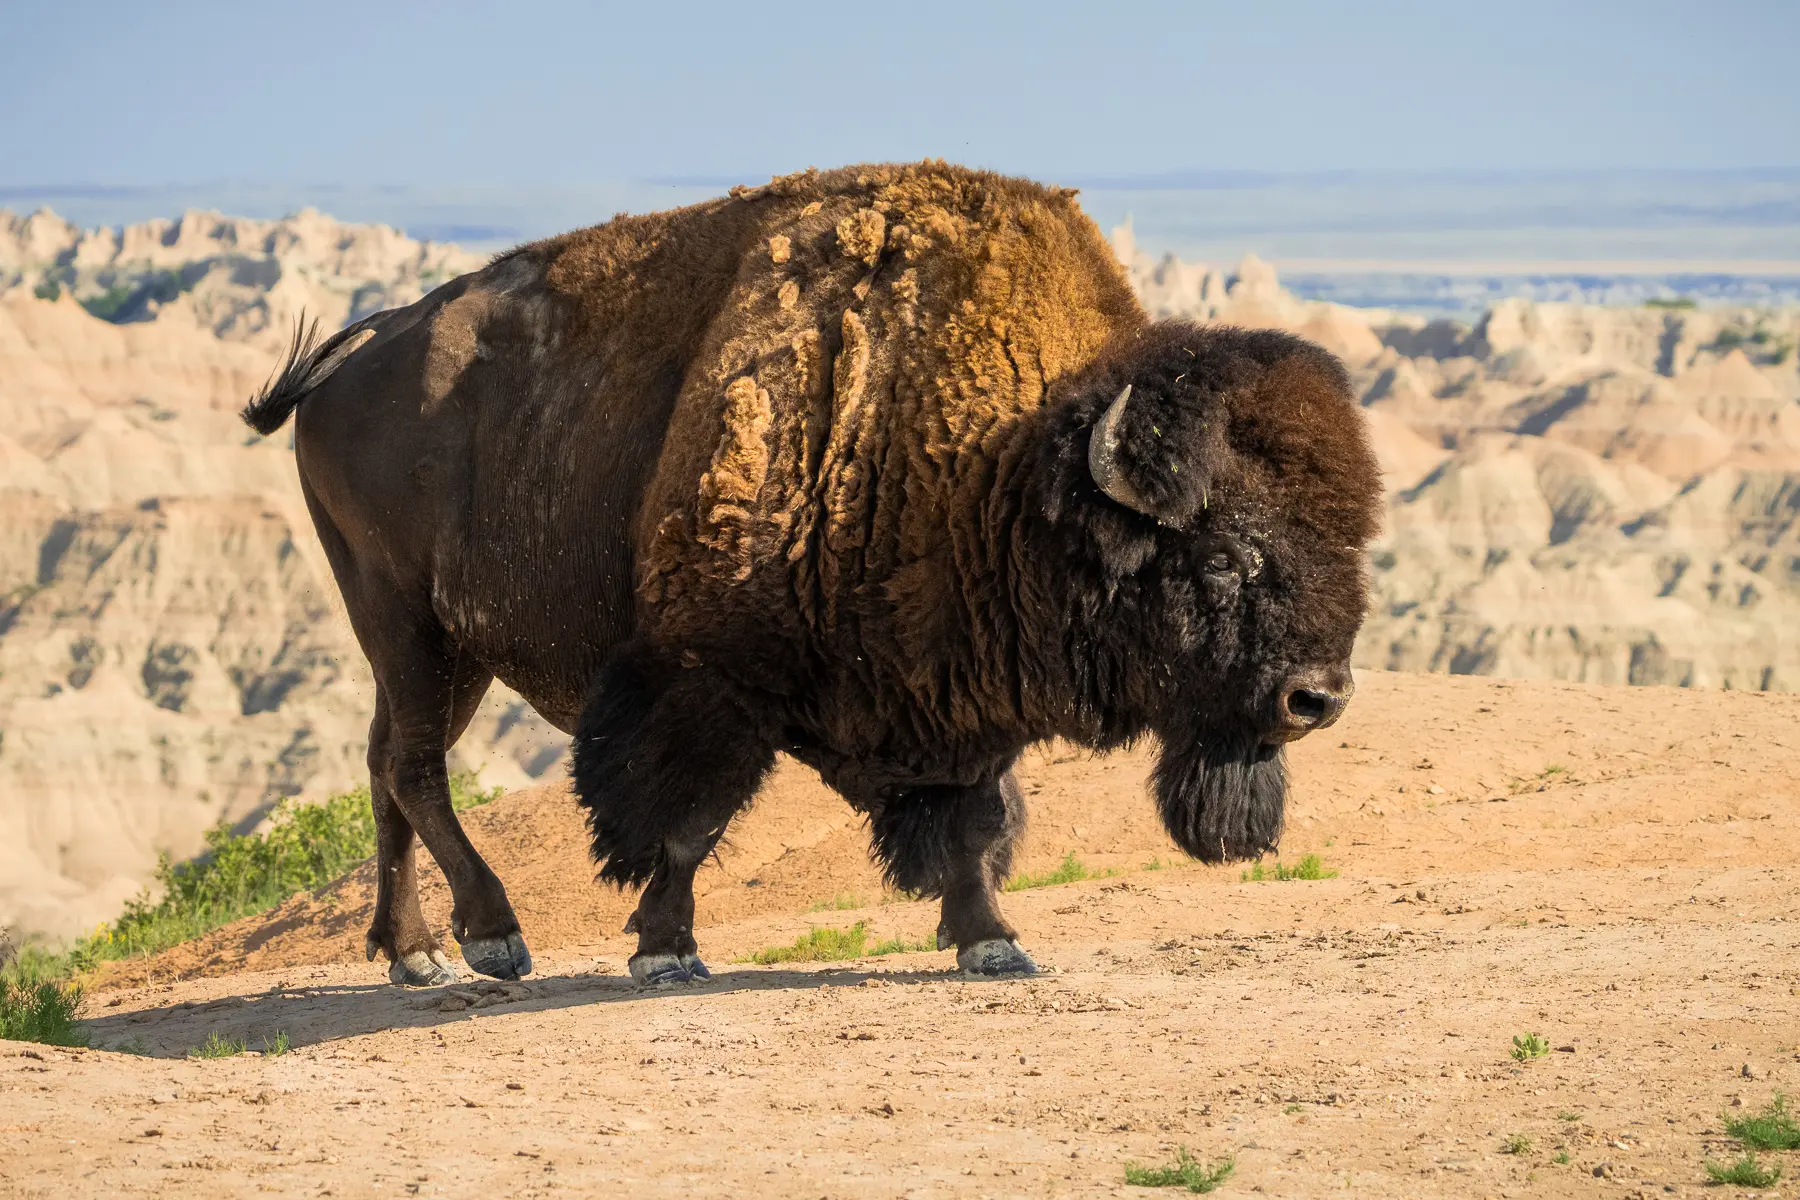
Wildlife photography in Badlands is full of surprises. While most people expect landscapes, the park is also home to bison, bighorn sheep, pronghorn, coyotes, burrowing owls, and countless prairie dogs. Photographing these animals respectfully is both a matter of safety and ethical storytelling.
Best Lens for Photographing Bison Herds and Owl Families
I keep the Tamron 18-300mm lens ready to go while driving the park loop, often pulling over for bison herds or burrowing owl families. With a long focal range, I can keep a safe distance—especially important with large mammals like bison, who can be unpredictable, particularly if calves are nearby.
Best Lens for Photographing Prairie Dog Towns and Burrowing Owls
The Tamron 50-400mm is ideal for photographing prairie dog towns and burrowing owls from a respectful distance, allowing me to capture sharp, detailed images without disturbing these sensitive subjects. Its extended reach and fast focus make it easy to isolate behavior and expressions while staying safely outside the boundaries of their fragile habitat. Staying out of prairie dog towns by sticking to roads, maintained trails, or raised boardwalks is important to protect the fragile habitat, prevent the spread of disease like plague, and avoid disturbing the animals’ natural behaviors.
Don’t Harass or Bait Wildlife — Always Use A Long Lens Instead

Tips for visiting and photographing national parks always include a reminder: don’t harass or bait wildlife and always use a long lens instead of trying to get physically closer. For burrowing owls, I sat quietly on the far side of the road, allowing them to resume their natural behavior while I captured candid shots with a shallow depth of field and smooth background separation. This allowed me to capture several instances of food transfer between a breeding pair and their growing owlets.
Learning about the behavior of my subjects ahead of time helps me anticipate meaningful moments such as these food transfers. I firmly believe that the better naturalist you are the better nature photographer you will be.
TIP 6: Time It Right: Chase the Light
If I had to choose one guiding principle for Badlands National Park photography, it would be this: embrace the shoulders of the day. The best time to photograph the Badlands is undoubtedly early morning and late evening, when the sun hangs low and bathes the formations in gold, rose, or lavender hues.
In late June, sunrise came just after 5:00 a.m., and sunset lingered well past 9:00 p.m. That meant early alarms and long evenings—but also magical, fleeting light that made the effort more than worthwhile.
I scouted photo spots like Norbeck Pass and Pinnacles Overlook during midday, noting where the sun would fall and how I might want to compose at different times. Then I returned at sunrise or sunset, camera ready and tripod set, waiting for that moment when the rocks glowed and the sky bloomed with color.
Sunrise and Sunset Photography Tips
I arrive at least 30 minutes early to get set up and watch how the light evolves, using a tripod to keep exposures sharp in the low light. I make a point to look both toward the sun and away from it, as the most striking colors and lighting often unfold in opposite directions. It’s easy to let your tripod “grow roots,” but I regularly shift positions and shoot both vertical and horizontal frames to uncover new compositions and fully work the scene.
Final Thoughts: Photographing the Badlands Is a Journey
Whether you’re a seasoned photographer or just starting your journey, photographing the Badlands rewards patience, curiosity, and a willingness to rise early and linger late. It’s a place where geological time meets ephemeral light, where vast horizons and tiny details each tell part of the story.
Using versatile gear like Tamron lenses, especially the 18-300mm, helps simplify my kit while maximizing creative flexibility. Combine that with smart weather watching, respectful wildlife practices, and a commitment to working each subject from wide to tight, and I return home not just with beautiful photos—but with a deeper connection to one of America’s most unique national parks.
So, when someone asks me how to photograph national parks, I send them to the Badlands—and remind them to pack their patience, their curiosity, and a lens that can do it all.
Until next time, safe travels and interesting light! Cheers.
Learn more about Tamron lenses Alyce Bender uses to photograph in National Parks like the badlands at an revendedor autorizado Tamron perto de você ou visite o site Loja TAMRON.
Sobre Alyce Bender

Alyce Bender é fotógrafa profissional da natureza, escritora, educadora, veterana da Força Aérea dos EUA e embaixadora da Tamron Americas. Sua paixão pelo ambiente natural a impele a conectar outras pessoas com a natureza por meio de educação e experiências que promovem a conservação, a criatividade e a ética na fotografia. Seu trabalho foi apresentado em exposições coletivas e individuais nos EUA, bem como em publicações nacionais e internacionais, do Reino Unido ao Japão. Ao conduzir excursões, o objetivo de Bender é ajudar os fotógrafos a expandir sua visão pessoal e suas habilidades naturalistas. Quando não está em campo, ela oferece uma variedade de programas educacionais e de orientação. Site | Instagram