 Instant Savings
 Support
 Find a Dealer
Nature, Magnified
With a scientist’s curiosity and her Tamron 90mm F2.8 macro lens, Chelsea Marcantonio captures the details of life on the smallest scale.
Author: Jenn Gidman
Images: Chelsea Marcantonio
Share Article
With a scientist’s curiosity and her Tamron 90mm F2.8 macro lens, Chelsea Marcantonio captures the details of life on the smallest scale.
Chelsea Marcantonio admits she’s super picky when it comes to image sharpness. “If I zoom into a photo and I don’t see the crispiest, cleanest details, that photo is no good to me,” the Nature Conservancy of Canada staffer explains. “With the Tamron lenses I’ve used, including the 28-75mm F2.8 Di III VXD G2 zoom, the sharpness has always been consistently impressive.”
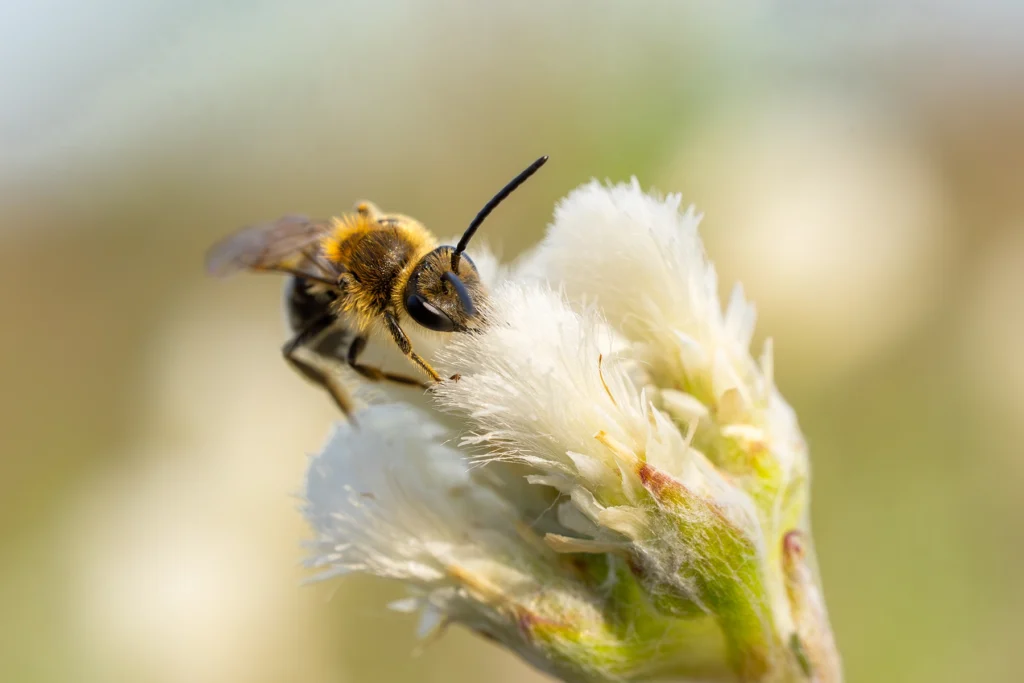
The latest addition to Chelsea’s macro adventures arsenal: the Tamron 90mm F/2.8 Di III VXD M1:1 mid-telephoto macro lens for her Sony mirrorless camera system. “I’m absolutely in love with this lens for my style of macro photography,” she says. “The 90mm F2.8 has a 1:1 magnification ratio, but with this quality of sharpness, you’re able to crop photos in quite significantly. This has been a blessing for smaller insects like metallic sweat bees, which are often no more than half an inch long. I want viewers to see what I was actually seeing in person; I want them to start noticing everything they’ve been breezing past their whole lives!”
The 90mm F2.8 macro lens also provides enough working distance for insects that are more skittish, allowing Chelsea to capture higher-magnification macro photos without spooking the critters away. “Plus, this lens provides a delightfully smooth separation between a subject and its background at F2.8, making it a suitable portrait lens as well as a macro lens,” Chelsea says.
After first practicing on static subjects to get more comfortable shooting at such a high magnification (more on that below), Chelsea had the confidence to tackle moving subjects. “I chose bees and butterflies that were feeding on flowers or salts and minerals in the soil,” she says. “I’m 6’1″, but when I’m shooting macro, you’ll find me curled up on the ground to be eye level with my subject. I used to be easily discouraged from activities I wasn’t immediately good at, but learning macro has been an incredibly fun challenge.”

CHELSEA’S QUICK TIPS
Practice on nonmobile subjects first before diving into macro photography.
Shooting at a higher magnification and focal length means there will be less light, and the depth of field will feel paper-thin. Micro movements from our breathing or our hands shaking will also be exaggerated. Shooting nonmobile subjects first will help provide a constant while learning all of the adjustable settings. This will also help you understand the focal plane while you shift and tilt your camera around a static subject when you’re first tackling macro.
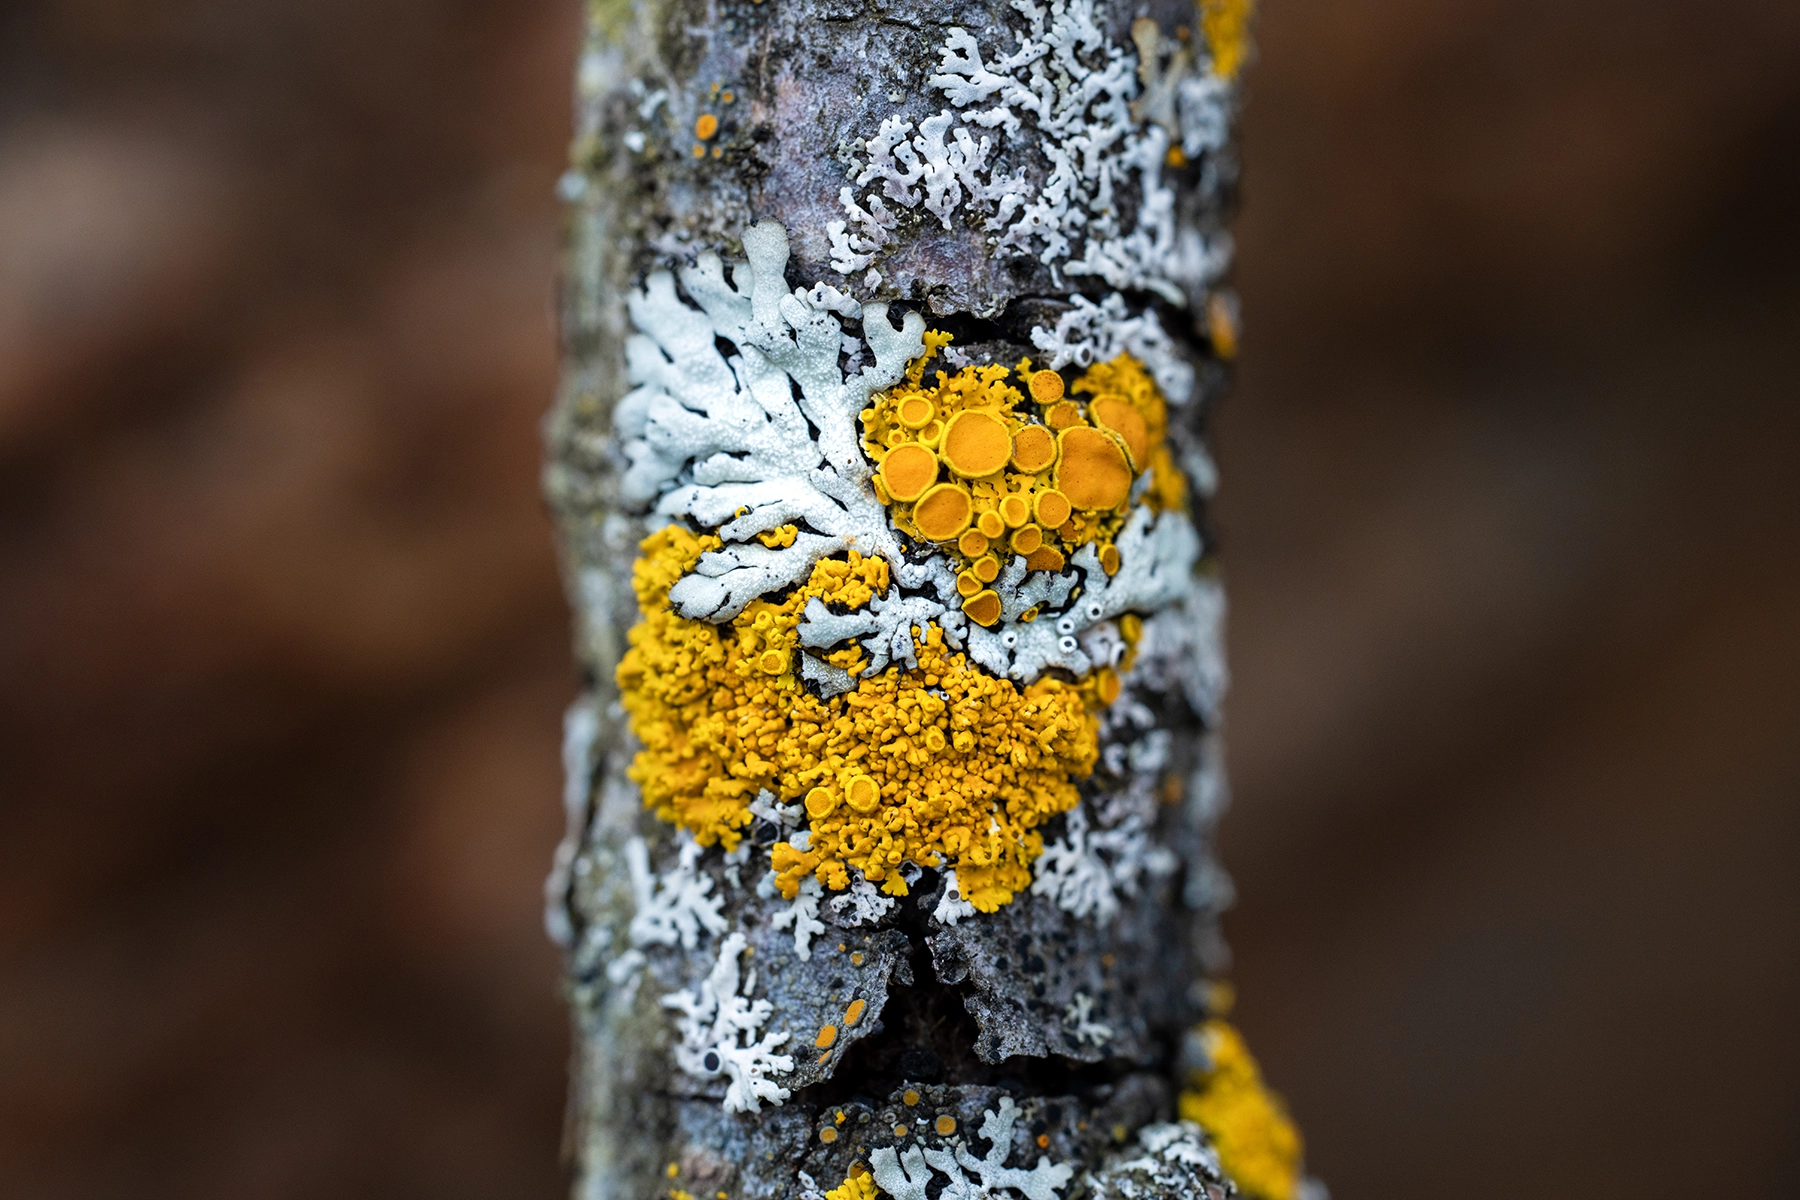
I hadn’t used a dedicated macro lens for my work until the Tamron 90mm F2.8, so I first decided to practice on a subject that couldn’t fly or slither away. It still had to be something alive to entertain me and hold the interest of my biology-loving brain. The lichens I found were a suitable choice. They aren’t a single organism, but rather a relationship between a fungus and algae and/or cyanobacteria. British soldier lichens and sunburst lichens have always been there for me during the gray, sleepy days between winter and spring where I need fun pops of color the most.
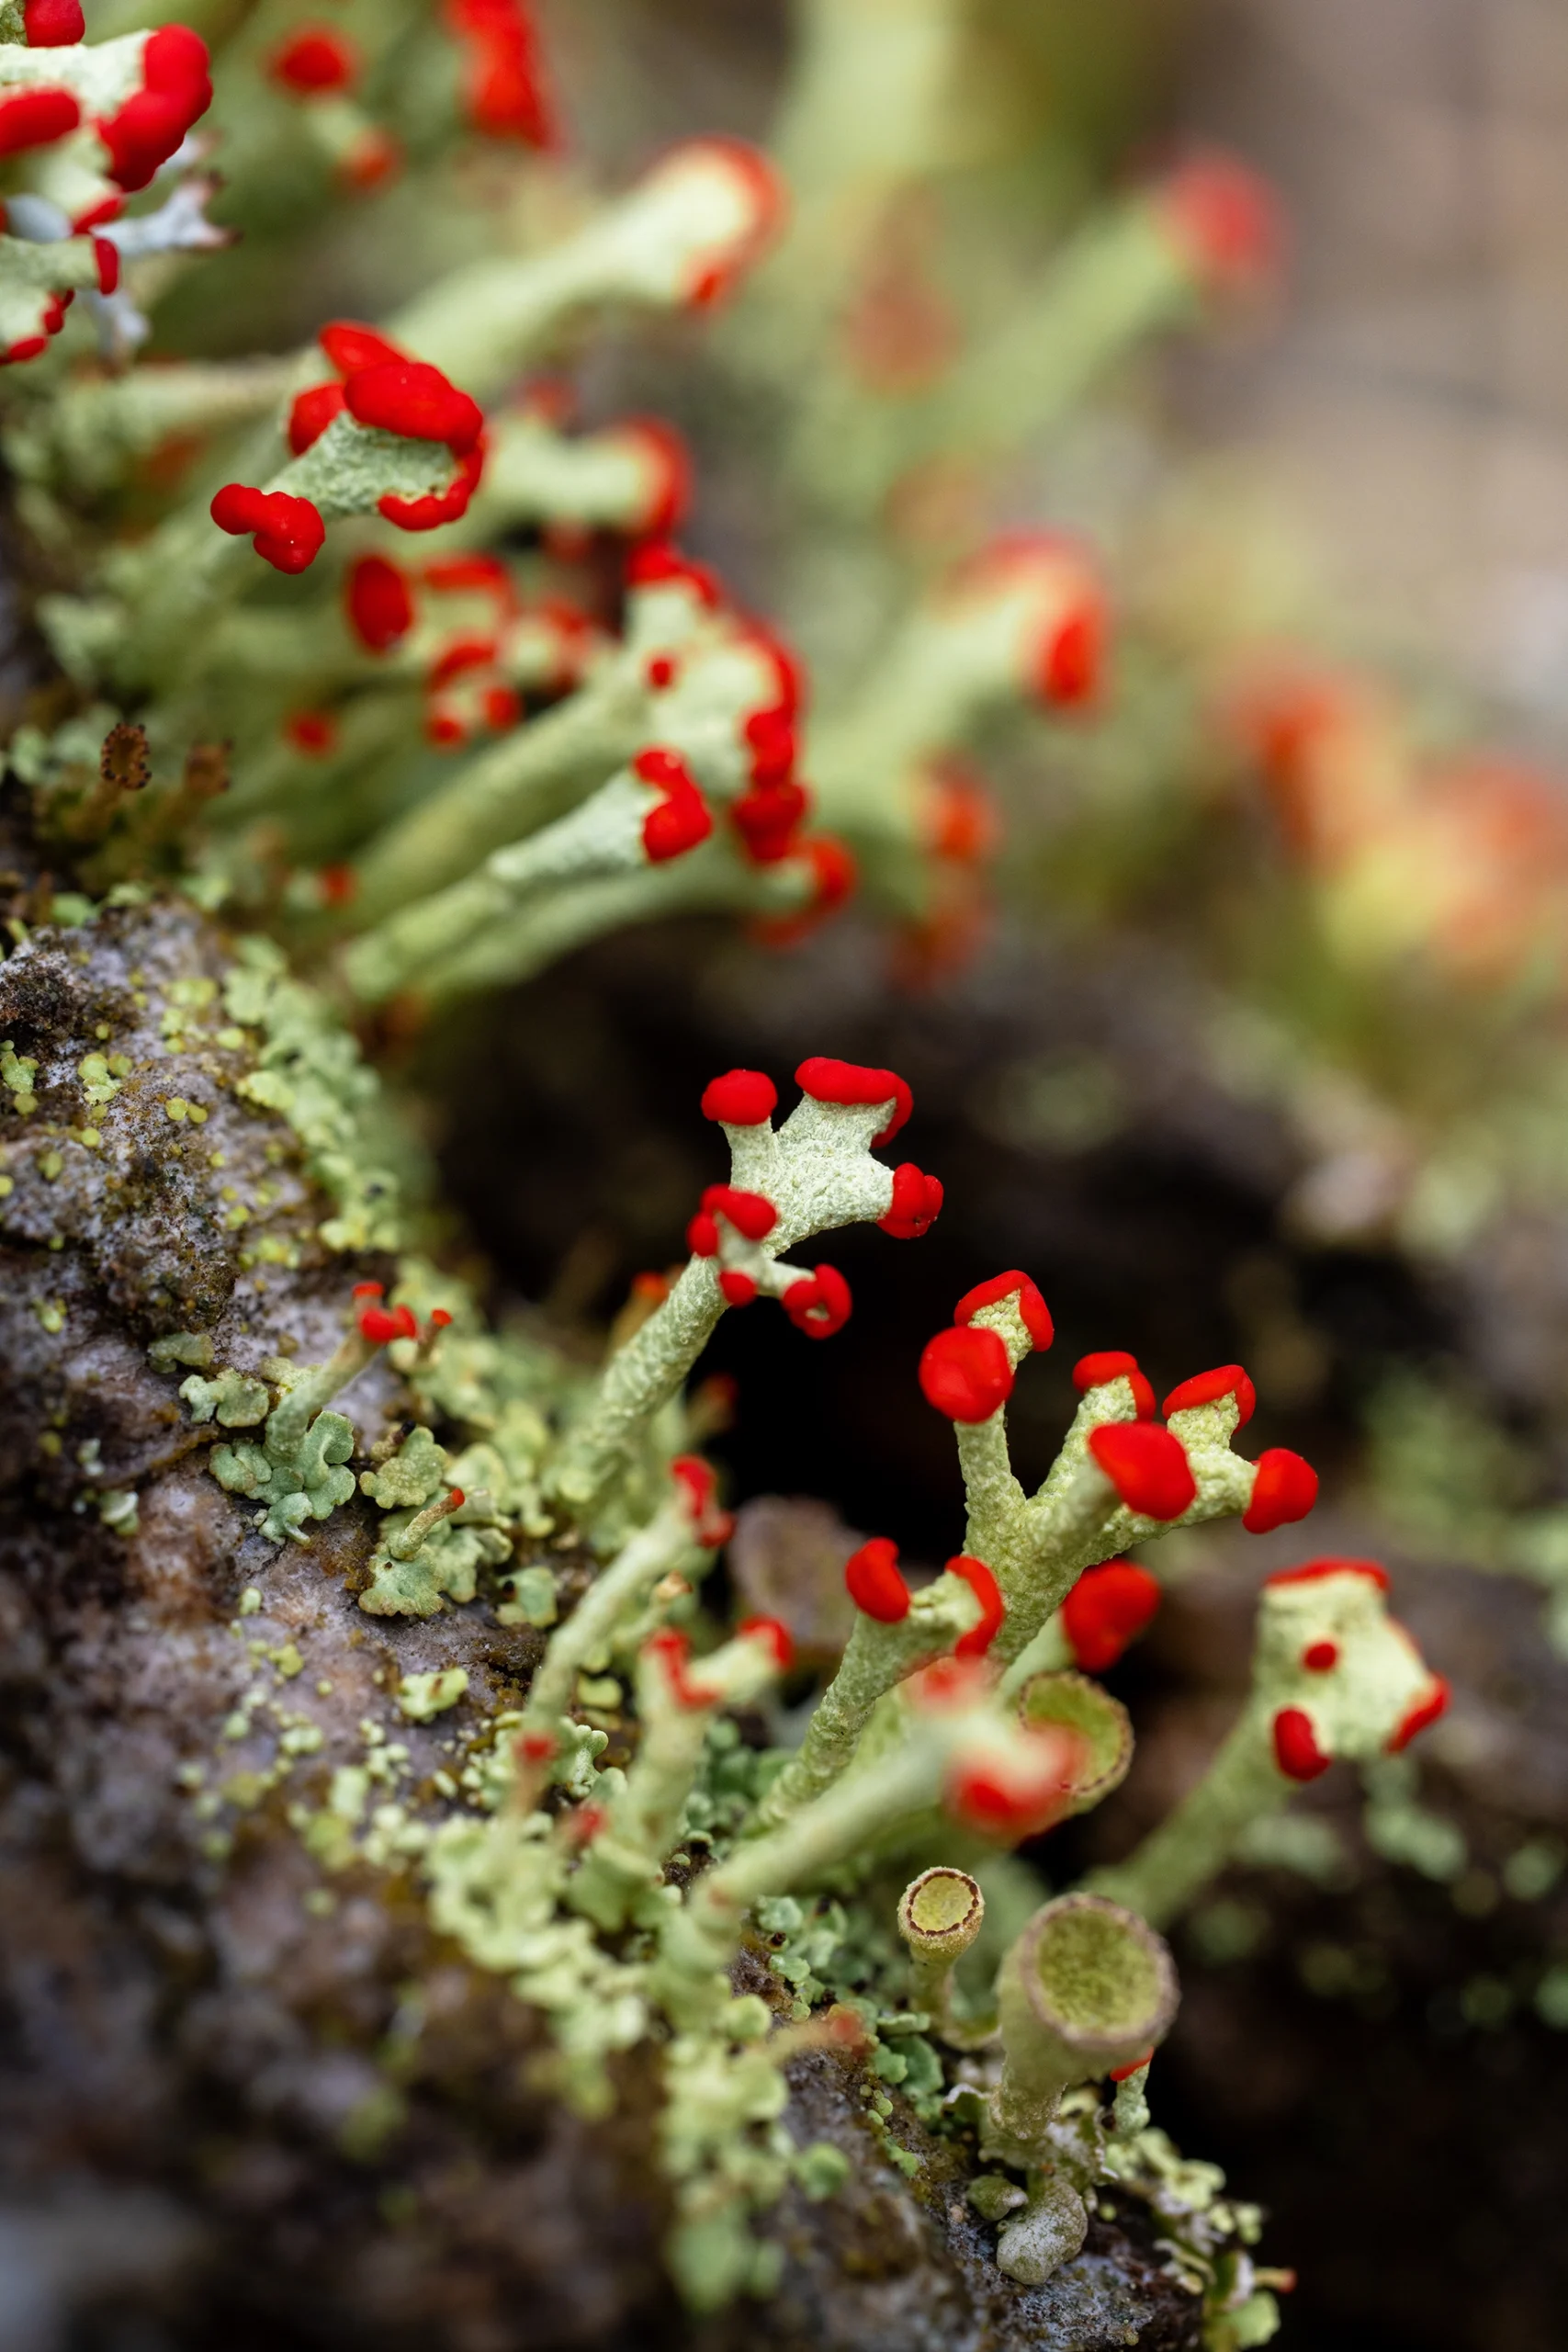
I’ve always wanted photos of these lichens, but I never had a lens that could magnify them enough, until now. With the Tamron 90mm, I’m able to capture these otherworldly landscapes of lichen that could fit on your fingertip.
Look for lots and lots of light.
Shooting with adequate light is necessary to get the sharpest details. Choose brighter days and shoot subjects in the open—not under the shade of a forest canopy—or invest in a flash and diffuser to always have a consistent delivery of light, which I recently did. One of my favorite photos with this combo was a jumping spider I found resting in a curled-up leaf, which you can see here.
I didn’t have a flash at the time I went out for these photos, so I chose brighter, sunnier days that offered me adequate light for a larger f-stop (e.g., F5.6 or higher) to capture more of the insect in focus in a single image, and a fast-enough shutter speed to freeze any movement from the insect or wind. I would rest my elbows or wrist on the ground to steady my hands and hold my breath before shooting a high burst of images to get at least a few that I loved. I tried to get their eyes in focus or most of their body on the same focal plane.
Learn your subject’s behaviors.
Some insects and spiders are more patient and forgiving than others—they’ll let you take as many photos as you please. For instance, a trashline orbweaver spider that’s resting and camouflaged in their web will likely be a willing subject. Others will only stop while feeding, like this eastern pine elfin taking advantage of my sweat after a long hike. Choosing to shoot during cooler temperatures—like in the mornings, which also tend to be less windy—may slow bugs down, like this lucky shot of a metallic green sweat bee, which normally zooms around from flower to flower.
To see more of Chelsea Marcantonio’s work, check out her Instagram.