 Instant Savings
 Support
 Find a Dealer
As you advance in your filmmaking journey, mastering advanced videography techniques becomes essential for creating cinematic, professional-quality video. From refined lighting setups and faster apertures to dynamic camera movement and advanced lens control, these techniques help you shape mood, depth, and visual impact. If you’re wondering how to make your videos look more cinematic, the answer often lies in mastering lighting ratios, aperture control, and intentional camera movement. In this installment of our videography series, we explore how to elevate production value through advanced lighting strategies, high-performance video lenses, image stabilization, wireless lens control, and post-production fundamentals.
In This Guide, You’ll Learn How To:
- Use advanced lighting techniques for cinematic depth and subject separation
- Maximize F2.8 apertures for shallow depth of field and bokeh
- Choose the best zoom lenses for cinematic video production
- Apply image stabilization for smooth professional footage
- Execute dynamic tracking, dolly, and zoom shots
- Improve video production quality through post-processing techniques
Advanced Lighting Setups: Crafting the Perfect Scene

Lighting defines texture, depth, and emotional tone in professional filmmaking. If you want to understand how to shoot cinematic video, controlling light direction and contrast is one of the most powerful tools available.
Three-Point Lighting and Expanded Setups
Three-point lighting — key, fill, and backlight — creates subject separation and dimension. Adding a hair light enhances edge definition, while ambient lighting softens shadows for a natural aesthetic. Careful positioning helps avoid flat or overexposed scenes.
Shaping Light With Professional Modifiers
Softboxes diffuse harsh light for interviews and close-ups.
Grids focus beams for dramatic emphasis.
Reflectors bounce light to control contrast without adding extra fixtures.
Mastery of modifiers allows filmmakers to control light direction, intensity, and falloff.
Practical Lighting for Realistic Scenes

Practical lights—visible light sources like lamps or candles—add authenticity and texture to your videos. These lights not only contribute to the set design but also blend seamlessly with controlled lighting to create an organic, immersive feel. For instance, a bedside lamp can provide both illumination and a warm ambiance, enhancing the scene’s relatability and mood. Thoughtfully integrating practical lights into your setup adds depth and makes your scenes more visually and emotionally compelling.
How to Use Faster Apertures (F2.8) for Cinematic Depth and Low-Light Video
Understanding aperture is essential for achieving shallow depth of field and professional background separation.
Creating Cinematic Bokeh with F2.8 Lenses
Lenses such as the Tamron 20-40mm F/2.8 Di III VXD and 28-75mm F/2.8 Di III VXD G2 allow filmmakers to isolate subjects with shallow depth of field. If you’re searching for how to get a blurry background in video, shooting at F2.8 and increasing the distance between subject and background will dramatically enhance separation.
Maximizing Low-Light Video Performance
Faster apertures excel in low-light conditions, reducing the need for additional lighting and allowing you to capture clear footage in challenging environments. This is ideal for preserving natural ambiance in settings like dimly lit restaurants, nighttime cityscapes, or intimate indoor scenes. Lenses like the Tamron 28-75mm F/2.8 Di III VXD G2 offer excellent low-light performance, enabling you to shoot at lower ISO settings with minimal noise. A wide aperture lets in more light, allowing for faster shutter speeds and reducing motion blur, making it perfect for capturing moments where additional lighting isn’t feasible.
Wide apertures allow more light transmission, enabling:
- Lower ISO settings
- Reduced digital noise
- Faster shutter speeds
- Cleaner footage in dim environments
This is especially useful when determining how to film in low light without adding extra lighting equipment.
Advanced Lens Control for Filmmakers with TAMRON Lens Utility™ and TAMRON-LINK
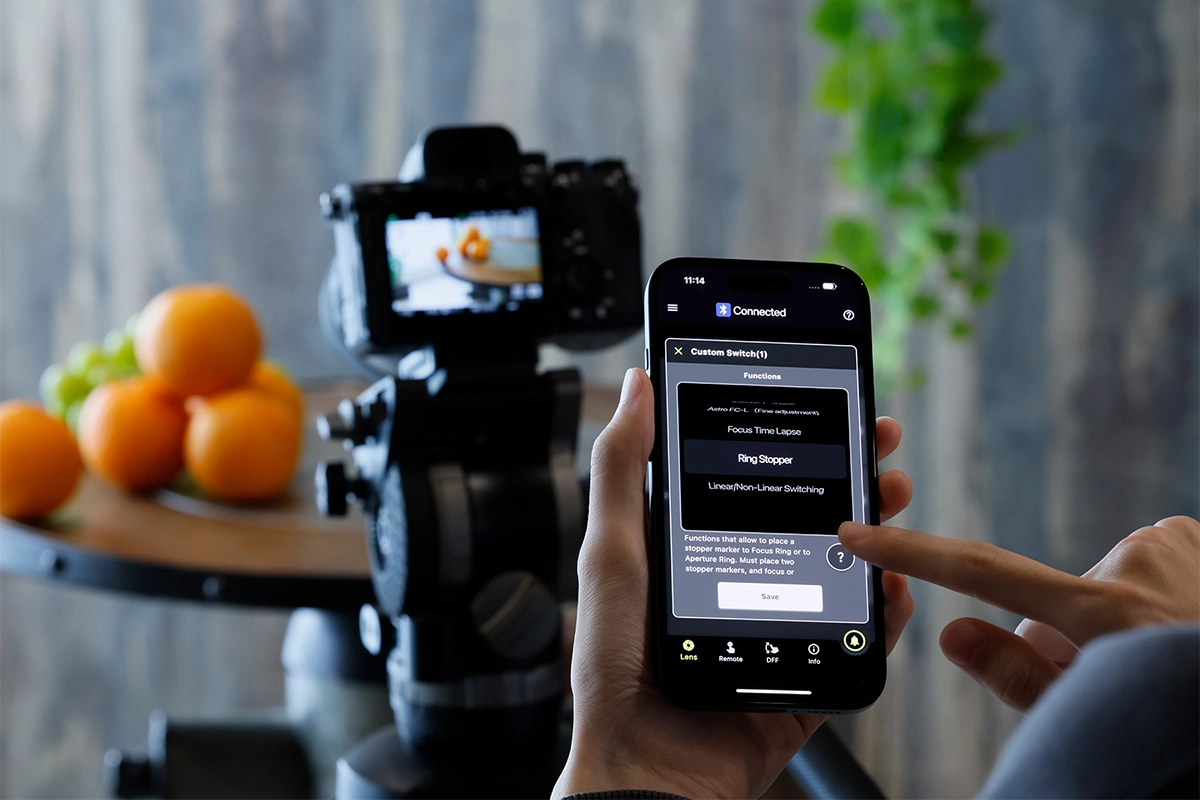
Beyond aperture and focal length, modern filmmakers increasingly rely on customizable lens control to refine focus precision and workflow efficiency.
Compatible lenses can be customized using TAMRON Lens Utility™, a dedicated software platform designed to enhance lens behavior for video production. This allows filmmakers and videographers to fine-tune focus operations, adjust manual focus response, and update firmware for optimized autofocus performance.
For mobile creators, the TAMRON Lens Utility™ Mobile app supports both iOS and Android smartphones. When paired with TAMRON-LINK — an optional accessory — supported lenses can connect wirelessly via Bluetooth. This enables remote lens control without cables, expanding flexibility on set.
Wireless lens control is particularly helpful when learning how to achieve smooth focus transitions in video, especially in these situations:
- Shooting on gimbals or stabilizers
- Working solo without a focus puller
- Mounting cameras in tight or elevated positions
- Executing precise, repeatable focus transitions
This setup increases workflow flexibility and precision for cinematic productions.
Advanced Camera Shots for Dynamic Visual Storytelling
Shot variation builds rhythm and engagement. Each shot type serves a different purpose and conveys a specific feeling or message to the audience. Understanding when and how to use each type of shot allows you to build a visual rhythm in your video, guiding the audience’s emotions and reactions throughout the viewing experience.
Tracking Shots for Immersive Motion
Tracking shots follow subjects in motion using sliders, dollies, or stabilizers. They increase production value and immerse viewers in action sequences.
Dolly Shots: for Emotional Impact
Dolly shots move the camera toward or away from the subject on a track, adding depth and motion to your scenes.
Dolly-ins create tension and intimacy.
Dolly-outs reveal context and scale.
Physical camera movement adds natural perspective shifts that zooms cannot replicate.
Mastering Zoom Shots with Stabilization
Zoom shots adjust focal length mid-shot to shift emphasis or reveal context. When using longer zoom ranges, image stabilization is essential to prevent micro-jitters.
Lenses such as the Tamron 17-70mm F/2.8 Di III-A VC RXD feature Vibration Compensation (VC), helping creators understand how to shoot professional video without distracting camera shake.
Video Post-Production Techniques for Professional Results
Post-production transforms raw footage into a polished final film.
Choosing Professional Editing Software
Selecting the right video editing software is paramount for streamlining your post-production workflow and achieving the desired look and feel for your videos. Different software options cater to varying needs and levels of expertise, so it’s important to choose one that aligns with your specific requirements.
- Adobe Premiere Pro – Advanced timeline editing and Creative Cloud integration.
- Final Cut Pro – Optimized performance for Mac workflows.
- DaVinci Resolve – Industry-leading color grading and full post suite.
Core Editing Techniques
Basic editing techniques are the foundation of your video’s final look and feel. Start by organizing your footage—labeling, sorting, and reviewing clips to ensure a smooth workflow. Create a rough cut to assemble the video in sequence, focusing on structuring the narrative without worrying too much about precise timing. Pay close attention to pacing, as it’s essential for keeping the audience engaged. Use a mix of shot types—close-ups, wide shots, and medium shots—to create a visual rhythm that enhances your storytelling and adds variety to your video.
- Organize and label footage
- Build a structured rough cut
- Refine pacing and rhythm
- Balance shot variety
Cinematic Color Grading
Color grading establishes mood and visual consistency. By adjusting color balance, contrast, and saturation, you can transform the mood of a scene and make it warmer, cooler, more vibrant, or subdued. Color grading also helps maintain visual consistency across different shots, particularly when scenes are filmed in varying lighting conditions. Tools like DaVinci Resolve offer advanced features that let you manipulate color with precision, helping you create a distinct aesthetic that aligns with your creative vision, whether aiming for a natural or cinematic feel.
Sound Design and Audio Enhancement
Sound design is essential for immersing the audience and enhancing storytelling. Clear, well-balanced audio makes sure the dialogue is understandable, and that background sounds and music contribute to the atmosphere without distracting from it. Address issues like background noise, hissing, or muffled voices to maintain audio quality. Consider using sound effects to enhance realism—such as footsteps on gravel or city traffic—to make your video more immersive. Additionally, sound effects can underscore key moments, adding tension or emotional impact, making your video more cohesive and memorable.
People Also Ask About Advanced Videography Techniques
What makes a video look cinematic?
Cinematic video combines controlled lighting, shallow depth of field, intentional camera movement, and professional color grading.
How do I make my videos look more professional?
Use stable camera support, controlled lighting, smooth camera movement, and proper color grading to elevate production quality.
Is F2.8 enough for cinematic filmmaking?
Yes. F2.8 provides strong subject separation and performs well in low light while maintaining sharpness.
How do filmmakers achieve smooth focus transitions?
They use manual focus techniques or programmable tools such as TAMRON Lens Utility™ with compatible lenses.
Are zoom lenses good for professional video?
Yes. Modern zoom lenses offer flexibility, sharpness, and stabilized performance for dynamic production environments.
Does wireless lens control improve filmmaking?
Yes. Wireless control increases flexibility for gimbal work, solo shooting, and precision focus pulls.
Elevating Your Videography Skills
Mastering advanced videography techniques requires refining lighting control, aperture selection, lens customization, stabilization, and post-production skills. By combining technical precision with creative intention, you can produce compelling cinematic films that captivate your audience.
Where to Buy Tamron Lenses
Learn more about Tamron lenses at an authorized Tamron dealer near you or shop directly at the official TAMRON Store.
Frequently Asked Questions About Cinematic Videography
What lens features matter most for advanced video?
Minimal focus breathing, smooth autofocus transitions, consistent aperture performance, stabilization, and responsive manual focus control.
Is image stabilization necessary for zoom lenses?
Yes, especially for handheld or telephoto shooting, where minor movement is amplified.
Can I control my lens wirelessly for video?
Yes. Compatible lenses connect via Bluetooth using TAMRON-LINK and the TAMRON Lens Utility™ Mobile app.
Which editing software is best for filmmakers?
Premiere Pro, Final Cut Pro, and DaVinci Resolve all offer professional-grade capabilities depending on workflow preference.
How can I improve my videography quickly?
Focus on lighting quality, stabilization, smooth camera movement, and disciplined post-production.