By Jenn Gidman
Images by Mike Moats
When Mike Moats is exploring in his yard or strolling around the neighborhood, he keeps an eye out for subjects he can use to make compelling macro photos. “I’m looking for textures, contrast, colors, lines—anything that has any or many of these elements,” he says. “It could be something with a unique pattern or color, or maybe the way a subject is being backlit. And I’m also looking for something I could possibly turn into an abstract: Even if the subject is easily identifiable, I want something interesting that’s going on within the design of that subject.”
For his type of photography, Mike has tapped into many lenses in Tamron’s macro lineup, including the SP 60mm Macro for his tabletop photography (“it’s got the short working distance I need”) and macro zooms like the 16-300mm VC PZD for their long-range reach. Now the new SP 90mm VC lens has joined his arsenal, complete with enhancements to its already superior optical performance such as new XY-shift compensation to boost the 90’s Vibration Compensation (VC) functionality, updated software that allows for increased AF focusing speed, and careful craftsmanship that includes a protective fluorine coating and moisture-proof and dust-resistant construction.
“Besides the fine optics of the lens, I especially love the moisture proofing and dust resistance since I’m outside most of the time,” Mike says. “And it looks and handles like a professional lens with its all-metallic barrel and sleek design.”
One of Mike’s favorite features of the 90mm VC lens is its ability to blur out the background to allow him to achieve the abstract art he’s creating. “I don’t want the clutter that’s in the background to compete with the main subject,” he says. “I want that main subject to pop out when it comes up on the screen or when someone sees it on a print. I may even want to have some blur going on in parts of the main subject as well: I’ll focus on a particular area, then soften down into the background, where I’ll often try to achieve a solid color.”
When he’s shooting outdoors, Mike relies on available light only and the occasional LED. “An LED light comes in handy if I want to add a special effect to the image, as you’ll see in a couple of the images I show here,” he says.
Check out how Mike captured these six macro photos with the 90mm VC.
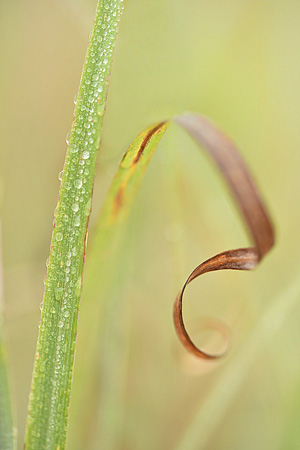
Photographed at F/4, 1/1600 sec., ISO 2000
Usually when you try to shoot a blade of grass, it’s hard to make it interesting, because there’s typically a lot of empty space around it. But this image worked out well because there happened to be a second, reddish blade of grass right next to it. So I had the blade of grass with all of the dewdrops on it, which provided the texture I wanted, and the nice line flow from that other blade of grass, which fills the frame perfectly and gives the image a more artistic look. I wanted the grass with the dewdrops to be in focus, with the red blade of grass somewhat in focus before it faded into the background at the bottom, with the background evolving into a blur of colors. That F/4 f-stop helped me achieve that effect.
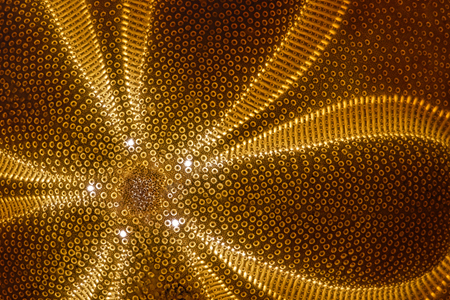
Photographed at F/57, 0.3 sec,. ISO 800
For this photo of a sea biscuit, which is a relative of the sand dollar (it’s not as flat as the sand dollar and is round and hollow), I wanted to capture its intricate patterns. Because it’s hollow inside, I placed an LED light behind it so the light would penetrate through its tiny holes and really accentuate those patterns. I’ve got everything in this image I like to see: textures, lines, and the contrast between light and dark areas.

Photographed at F/4.5, 1/80 sec., ISO 400
Believe it or not, this is a large, 2.5-inch-thick geography book filled with colorful maps. What you see here are the pages of the book. I simply opened the book up and contorted the pages into different lines and patterns. Then I took an LED light and positioned in along the back side so that the light penetrated through the pages. I focused on the very front edges of the pages, and by using a smaller-number f-stop I was able to blur all of the colors that appeared on the inside of the pages. The light coming through enhances those colors, and the soft blur of the lens softens the shades.
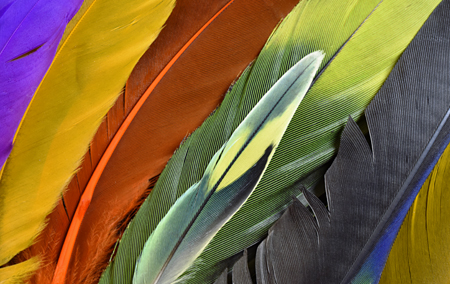
Photographed at F/16, 1/40 sec., ISO 400
A woman in one of my workshops raised birds and collected the feathers that fell off them, and one day she brought in a bunch to give to me. So I’ve got all kinds of photos of feathers where I simply make arrangements on a tabletop and then take pictures of them in different ways. For this image, I wanted everything in focus top to bottom and side to side, so I used a higher f-stop number to get more depth-of-field. All of those elements I mentioned earlier appear here as well: I’ve got the color and texture contrasts, plus all kinds of lines going in different directions in the feather veins.

Photographed at F/3.5, 1/320 sec., ISO 800
They had cut down all of the diseased elm trees at one of the parks near me, so all of these stumps were just scattered around. I liked the pattern that appeared on this stump and the way it cracked—again, going back to those eye-catching lines and textures. That big, heavy line you see in the upper-right corner is actually from the chainsaw itself, showing where it had gone into the trunk.
As for the butterfly, there’s a site online where you can purchase expired butterflies to decorate your home or use for other artistic purposes. I buy them, take them out of the box, and bring them with me in the field in case I find something interesting to place a butterfly on. In this case, the butterfly’s beautiful blue coloring contrasted well with the drab gray of the stump, and its lines complemented the pattern of the stump as well.
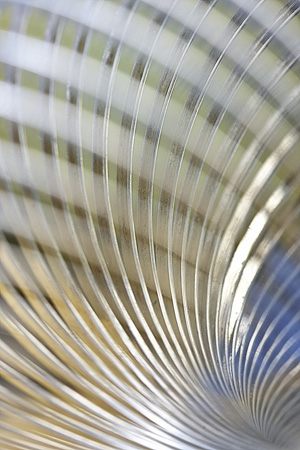
Photographed at F/10, 1/8 sec., ISO 400
This is actually a Slinky. They’re great for macro photography because you can twist them into different shapes to get horizontal lines, vertical lines, lines going in all different directions. I used a smaller f-stop so I’d get some blur in the horizontal lines in the foreground, then focused through those lines into the back section, where the lines are in focus. I also used a small LED to get a slight bluish tint in the background.
And all it took for this image was a $3 toy. That’s the terrific thing about macro photography: It could be a freezing day in the dead of winter or a hot, humid day in mid-summer when you don’t feel like heading outdoors. Macro photographers can stay inside and play all year long.
To see more of Mike Moats’ work, go to www.tinylandscapes.com.